|
|
$ workon <your env name here> # optional
$ pip install imutils
|
Face recognition dataset
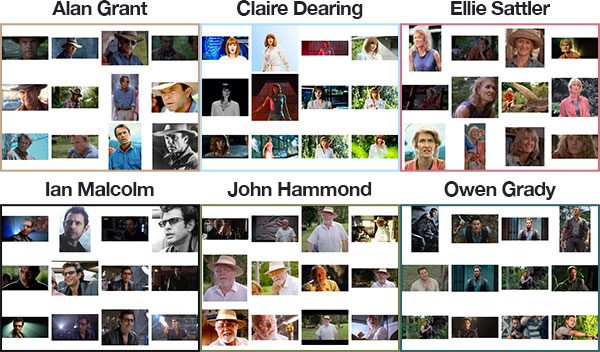
Figure 2: An example face recognition dataset was created programmatically with Python and the Bing Image Search API. Shown are six of the characters from the Jurassic Park movie series.
Since Jurassic Park (1993) is my favorite movie of all time, and in honor of Jurassic World: Fallen Kingdom (2018) being released this Friday in the U.S., we are going to apply face recognition to a sample of the characters in the films:
This dataset was constructed in < 30 minutes using the method discussed in my How to (quickly) build a deep learning image dataset tutorial. Given this dataset of images we’ll:
- Create the 128-d embeddings for each face in the dataset
- Use these embeddings to recognize the faces of the characters in both images and video streams
Face recognition project structure
The project structure should be as given below:
1
2
3
4
5
6
7
8
9
10
11
12
13
14
15
16
17
18
19
20
21
22
23
24
25
|
$ tree —filelimit 10 —dirsfirst
├── dataset
│ ├── alan_grant [22 entries]
│ ├── claire_dearing [53 entries]
│ ├── ellie_sattler [31 entries]
│ ├── ian_malcolm [41 entries]
│ ├── john_hammond [36 entries]
│ └── owen_grady [35 entries]
├── examples
│ ├── example_01.png
│ ├── example_02.png
│ └── example_03.png
├── output
│ └── lunch_scene_output.avi
├── videos
│ └── lunch_scene.mp4
├── search_bing_api.py
├── encode_faces.py
├── recognize_faces_image.py
├── recognize_faces_video.py
├── recognize_faces_video_file.py
└── encodings.pickle
10 directories, 11 files
|
The project has 4 top-level directories:
- dataset/ : Contains face images for six characters organized into sub directories based on their respective names.
- examples/ : Has three face images for testing that are not in the data-set.
- output/ : This is where you can store your processed face recognition videos.
- videos/ : Input videos should be stored in this folder.
We also have 6 files in the root directory:
- search_bing_api.py : Step 1 is to build a data-set (This is already done). To learn how to use the Bing API to build a data-set, just see this blog post.
- encode_faces.py : Encodings (128-d vectors) for faces are built with this script.
- recognize_faces_image.py : Recognize faces in a single image (based on encodings from your data-set).
- recognize_faces_video.py : Recognize faces in a live video stream from your webcam and output a video.
- recognize_faces_video_file.py : Recognize faces in a video file residing on disk and output the processed video to disk.
- encodings.pickle : Facial recognition encodings are generated from data-set via encode_faces.py and then serialized to disk.
After a dataset of images is created (with search_bing_api.py ), run the encode_faces.py to build the embeddings.
From there, run the recognize scripts to actually recognize the faces.
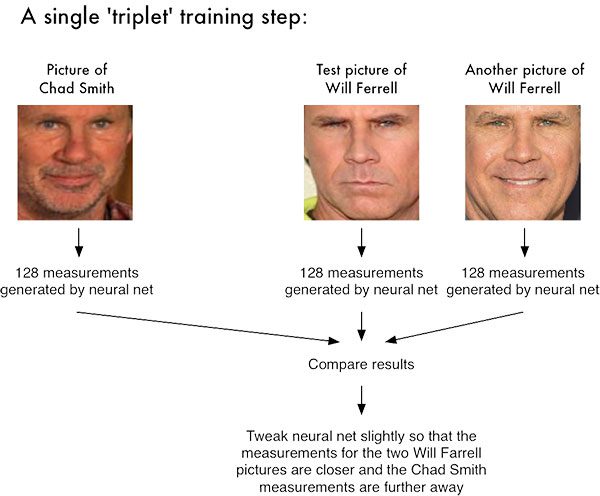
Encoding the faces using OpenCV and deep learning
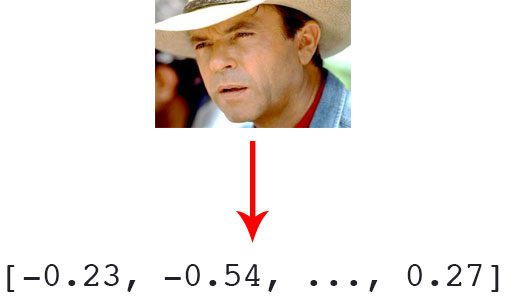
Figure 3: Facial recognition via deep learning and Python using the face_recognition module method generates a 128-d real-valued number feature vector per face.
Before we can recognize faces in images and videos, first we need to quantify the faces in training set. Keep in mind that we are not actually training a network here — the network has already been trained to create 128-d embeddings on a dataset of ~3 million images.
We certainly could train a network from scratch or even fine-tune the weights of an existing model but that is more than likely overkill for many projects. Furthermore, you would need a lot of images to train the network from scratch.
Instead, it’s easier to use the pre-trained network and then use it to construct 128-d embeddings for each of the 218 faces in our dataset.
Then, during classification, we can use a simple k-NN model + votes to make the final face classification. Other traditional machine learning models can be used here as well.
To construct our face embeddings open up encode_faces.py from the “Downloads”associated with this post:
|
|
# import the necessary packages
from imutils import paths
import face_recognition
import argparse
import pickle
import cv2
import os
|
First, we need to import required packages. Again, take note that this script requiresimutils , face_recognition , and OpenCV installed. Scroll up to the “Install your face recognition libraries” to make sure you have the libraries ready to go on your system.
Let’s handle our command line arguments that are processed at runtime with argparse :
9
10
11
12
13
14
15
16
17
|
# construct the argument parser and parse the arguments
ap = argparse.ArgumentParser()
ap.add_argument(„-i“, „–dataset“, required=True,
help=„path to input directory of faces + images“)
ap.add_argument(„-e“, „–encodings“, required=True,
help=„path to serialized db of facial encodings“)
ap.add_argument(„-d“, „–detection-method“, type=str, default=„cnn“,
help=„face detection model to use: either `hog` or `cnn`“)
args = vars(ap.parse_args())
|
We’re using argparse to parse command line arguments. When you run a Python program in your command line, you can provide additional information to the script without leaving your terminal. Lines 10-17 do not need to be modified as they parse input coming from the terminal. Check out my blog post about command line arguments if these lines look unfamiliar.
Let’s list out the argument flags and discuss them:
- —dataset : The path to our dataset (we created a dataset with search_bing_api.py.
- —encodings : Our face encodings are written to the file that this argument points to.
- —detection–method : Before we can encode faces in images we first need to detectthem. Or two face detection methods include either hog or cnn . Those two flags are the only ones that will work for —detection–method .
Now that we’ve defined our arguments, let’s grab the paths to the files in our dataset (as well as perform two initializations):
|
|
# grab the paths to the input images in our dataset
print(„[INFO] quantifying faces…“)
imagePaths = list(paths.list_images(args[„dataset“]))
# initialize the list of known encodings and known names
knownEncodings = []
knownNames = []
|
Line 21 uses the path to our input dataset directory to build a list of all imagePaths contained therein.
We also need to initialize two lists before our loop, knownEncodings and knownNames , respectively. These two lists will contain the face encodings and corresponding names for each person in the dataset (Lines 24 and 25).
27
28
29
30
31
32
33
34
35
36
37
|
# loop over the image paths
for (i, imagePath) in enumerate(imagePaths):
# extract the person name from the image path
print(„[INFO] processing image {}/{}“.format(i + 1,
len(imagePaths)))
name = imagePath.split(os.path.sep)[–2]
# load the input image and convert it from BGR (OpenCV ordering)
# to dlib ordering (RGB)
image = cv2.imread(imagePath)
rgb = cv2.cvtColor(image, cv2.COLOR_BGR2RGB)
|
This loop will cycle 218 times corresponding to our 218 face images in the dataset. We’re looping over the paths to each of the images on Line 28.
From there, we’ll extract the name of the person from the imagePath (as our subdirectory is named appropriately) on Line 32.
Then let’s load the image while passing the imagePath to cv2.imread (Line 36).
OpenCV orders color channels in BGR, but the dlib actually expects RGB. Theface_recognition module uses dlib , so before we proceed, let’s swap color spaces on Line 37, naming the new image rgb .
Next, let’s localize the face and compute encodings:
39
40
41
42
43
44
45
46
47
48
49
50
51
52
|
# detect the (x, y)-coordinates of the bounding boxes
# corresponding to each face in the input image
boxes = face_recognition.face_locations(rgb,
model=args[„detection_method“])
# compute the facial embedding for the face
encodings = face_recognition.face_encodings(rgb, boxes)
# loop over the encodings
for encoding in encodings:
# add each encoding + name to our set of known names and
# encodings
knownEncodings.append(encoding)
knownNames.append(name)
|
For each iteration of the loop, we’re going to detect a face (or possibly multiple faces and assume that it is the same person in multiple locations of the image — this assumption may or may not hold true in your own images so be careful here).
For example, let’s say that rgb contains a picture (or pictures) of Ellie Sattler’s face.
Lines 41 and 42 actually find/localize the faces of her resulting in a list of face boxes . We pass two parameters to the face_recognition.face_locations method:
- rgb : Our RGB image.
- model : Either cnn or hog (this value is contained within our command line arguments dictionary associated with the „detection_method“ key). The CNN method is more accurate but slower. HOG is faster but less accurate.
Then, we’re going to turn the bounding boxes of Ellie Sattler’s face into a list of 128 numbers on Line 45. This is known as encoding the face into a vector and theface_recognition.face_encodings method handles it for us.
From there we just need to append the Ellie Sattler encoding and name to the appropriate list ( knownEncodings and knownNames ).
We’ll continue to do this for all 218 images in the dataset.
What would be the point of encoding the images unless we could use the encodings in another script which handles the recognition?
Let’s take care of that now:
|
|
# dump the facial encodings + names to disk
print(„[INFO] serializing encodings…“)
data = {„encodings“: knownEncodings, „names“: knownNames}
f = open(args[„encodings“], „wb“)
f.write(pickle.dumps(data))
f.close()
|
Line 56 constructs a dictionary with two keys — „encodings“ and „names“ .
From there Lines 57-59 dump the names and encodings to disk for future recall.
How should to run the encode_faces.py script in the terminal?
To create our facial embeddings open up a terminal and execute the following command:
1
2
3
4
5
6
7
8
9
10
11
12
|
$ python encode_faces.py —dataset dataset —encodings encodings.pickle
[INFO] quantifying faces...
[INFO] processing image 1/218
[INFO] processing image 2/218
[INFO] processing image 3/218
...
[INFO] processing image 216/218
[INFO] processing image 217/218
[INFO] processing image 218/218
[INFO] serializing encodings...
$ ls –lh encodings*
–rw–r—r—@ 1 adrian staff 234K May 29 13:03 encodings.pickle
|
As you can see from our output, we now have a file named encodings.pickle — this file contains the 128-d face embeddings for each face in our dataset.
Recognizing faces in video

Figure 7: Facial recognition in video via Python, OpenCV, and deep learning.
Now that we have applied face recognition to images let’s also apply face recognition to videos (in real-time) as well.
Important Performance Note: The CNN face recognizer should only be used in real-time if you are working with a GPU (you can use it with a CPU, but expect less than 0.5 FPS which makes for a choppy video). Alternatively (you are using a CPU), you should use the HoG method (or even OpenCV Haar cascades covered in a future blog post) and expect adequate speeds.
The following script draws many parallels from the previous recognize_faces_image.py script. Therefore I’ll be breezing past what we’ve already covered and just review the video components so that you understand what is going on.
Once you’ve grabbed the “Downloads”, open up recognize_faces_video.py and follow along:
1
2
3
4
5
6
7
8
9
10
11
12
13
14
15
16
17
18
19
20
|
# import the necessary packages
from imutils.video import VideoStream
import face_recognition
import argparse
import imutils
import pickle
import time
import cv2
# construct the argument parser and parse the arguments
ap = argparse.ArgumentParser()
ap.add_argument(„-e“, „–encodings“, required=True,
help=„path to serialized db of facial encodings“)
ap.add_argument(„-o“, „–output“, type=str,
help=„path to output video“)
ap.add_argument(„-y“, „–display“, type=int, default=1,
help=„whether or not to display output frame to screen“)
ap.add_argument(„-d“, „–detection-method“, type=str, default=„cnn“,
help=„face detection model to use: either `hog` or `cnn`“)
args = vars(ap.parse_args())
|
We import packages on Lines 2-8 and then proceed to parse our command line arguments on Lines 11-20.
We have four command line arguments, two of which you should recognize from above ( —encodings and —detection–method ). The other two arguments are:
- —output : The path to the output video.
- —display : A flag which instructs the script to display the frame to the screen. A value of 1 displays and a value of 0 will not display the output frames to our screen.
From there we’ll load our encodings and start our VideoStream :
22
23
24
25
26
27
28
29
30
31
|
# load the known faces and embeddings
print(„[INFO] loading encodings…“)
data = pickle.loads(open(args[„encodings“], „rb“).read())
# initialize the video stream and pointer to output video file, then
# allow the camera sensor to warm up
print(„[INFO] starting video stream…“)
vs = VideoStream(src=0).start()
writer = None
time.sleep(2.0)
|
To access our camera we’re using the VideoStream class from imutils. Line 29 starts the stream. If you have multiple cameras on your system (such as a built-in webcam and an external USB cam), you can change the src=0 to src=1 and so forth.
We’ll be optionally writing processed video frames to disk later, so we initialize writer toNone (Line 30). Sleeping for 2 complete seconds allows our camera to warm up (Line 31).
From there we’ll start a while loop and begin to grab and process frames:
33
34
35
36
37
38
39
40
41
42
43
44
45
46
47
48
49
50
|
# loop over frames from the video file stream
while True:
# grab the frame from the threaded video stream
frame = vs.read()
# convert the input frame from BGR to RGB then resize it to have
# a width of 750px (to speedup processing)
rgb = cv2.cvtColor(frame, cv2.COLOR_BGR2RGB)
rgb = imutils.resize(frame, width=750)
r = frame.shape[1] / float(rgb.shape[1])
# detect the (x, y)-coordinates of the bounding boxes
# corresponding to each face in the input frame, then compute
# the facial embeddings for each face
boxes = face_recognition.face_locations(rgb,
model=args[„detection_method“])
encodings = face_recognition.face_encodings(rgb, boxes)
names = []
|
Our loop begins on Line 34 and the first step we take is to grab a frame from the video stream (Line 36).
The remaining Lines 40-50 in the above code block are nearly identical to the lines in the previous script with the exception being that this is a video frame and not a static image. Essentially we read the frame , preprocess, and then detect face bounding boxes + calculate encodings for each bounding box.
Next, let’s loop over the facial encodings associated with the faces we have just found:
52
53
54
55
56
57
58
59
60
61
62
63
64
65
66
67
68
69
70
71
72
73
74
75
76
77
78
79
80
|
# loop over the facial embeddings
for encoding in encodings:
# attempt to match each face in the input image to our known
# encodings
matches = face_recognition.compare_faces(data[„encodings“],
encoding)
name = „Unknown“
# check to see if we have found a match
if True in matches:
# find the indexes of all matched faces then initialize a
# dictionary to count the total number of times each face
# was matched
matchedIdxs = [i for (i, b) in enumerate(matches) if b]
counts = {}
# loop over the matched indexes and maintain a count for
# each recognized face face
for i in matchedIdxs:
name = data[„names“][i]
counts[name] = counts.get(name, 0) + 1
# determine the recognized face with the largest number
# of votes (note: in the event of an unlikely tie Python
# will select first entry in the dictionary)
name = max(counts, key=counts.get)
# update the list of names
names.append(name)
|
In this code block, we loop over each of the encodings and attempt to match the face. If there are matches found, we count the votes for each name in the dataset. We then extract the highest vote count and that is the name associated with the face. These lines are identicalto the previous script we reviewed, so let’s move on.
In this next block, we loop over the recognized faces and proceed to draw a box around the face and the display name of the person above the face:
82
83
84
85
86
87
88
89
90
91
92
93
94
95
|
# loop over the recognized faces
for ((top, right, bottom, left), name) in zip(boxes, names):
# rescale the face coordinates
top = int(top * r)
right = int(right * r)
bottom = int(bottom * r)
left = int(left * r)
# draw the predicted face name on the image
cv2.rectangle(frame, (left, top), (right, bottom),
(0, 255, 0), 2)
y = top – 15 if top – 15 > 15 else top + 15
cv2.putText(frame, name, (left, y), cv2.FONT_HERSHEY_SIMPLEX,
0.75, (0, 255, 0), 2)
|
Those lines are identical too, so let’s focus on the video related code.
Optionally, we’re going to write the frame to disk, so let’s see how writing video to disk with OpenCV works:
97
98
99
100
101
102
103
104
105
106
107
|
# if the video writer is None *AND* we are supposed to write
# the output video to disk initialize the writer
if writer is None and args[„output“] is not None:
fourcc = cv2.VideoWriter_fourcc(*„MJPG“)
writer = cv2.VideoWriter(args[„output“], fourcc, 20,
(frame.shape[1], frame.shape[0]), True)
# if the writer is not None, write the frame with recognized
# faces to disk
if writer is not None:
writer.write(frame)
|
Assuming we have an output file path provided in the command line arguments and we haven’t already initialized a video writer (Line 99), let’s go ahead and initialize it.
On Line 100, we initialize the VideoWriter_fourcc . FourCC is a 4-character code and in our case we’re going to use the “MJPG” 4-character code.
From there, we’ll pass that object into the VideoWriter along with our output file path, frames per second target, and frame dimensions (Lines 101 and 102).
Finally, if the writer exists, we can go ahead and write a frame to disk (Lines 106-107).
Let’s handle whether or not we should display the face recognition video frames on the screen:
109
110
111
112
113
114
115
116
117
|
# check to see if we are supposed to display the output frame to
# the screen
if args[„display“] > 0:
cv2.imshow(„Frame“, frame)
key = cv2.waitKey(1) & 0xFF
# if the `q` key was pressed, break from the loop
if key == ord(„q“):
break
|
If our display command line argument is set, we go ahead and display the frame (Line 112) and check if the quit key ( „q“ ) has been pressed (Lines 113-116), at which point we’dbreak out of the loop (Line 117).
Lastly, let’s perform our housekeeping duties:
119
120
121
122
123
124
125
|
# do a bit of cleanup
cv2.destroyAllWindows()
vs.stop()
# check to see if the video writer point needs to be released
if writer is not None:
writer.release()
|
In Lines 120-125, we clean up and release the display, video stream, and video writer.
Are you ready to see the script in action?
To demonstrate real-time face recognition with OpenCV and Python in action, open up a terminal and execute the following command:
|
|
$ python recognize_faces_video.py —encodings encodings.pickle \
—output output/webcam_face_recognition_output.avi —display 1
[INFO] loading encodings...
[INFO] starting video stream...
|
References and Source code please visit the website – Face recognition with OpenCV, Python, and deep learning by Adrian Rosebrock.