
Configuring the Raspberry Pi
Raspberry Pi. This means the Raspberry Pi is ready to be recognized with the Raspberry Pi if a pre-learned person is detected, the person’s name will be shown on the person’s head on the screen. The program can thus detect unknown persons and will label them as search.
At first OpenCv should be installed which is explained in another chapter.
After that it is necessary to install the dlib toolkit (http://dlib.net/). Dlib is a modern C ++ toolkit containing machine learning algorithms and tools for creating complex software in C ++ to solve real world problems. The Dlib toolkit contains features like deep learning which is important for face recognition.
pip install dlib
Furthermore, Adam Geitgey’s face_recognition module (https://github.com/ageitgey/face_recognition) which uses, which uses the dlib toolkit. The face_recognition module recognizes and manipulates faces from Python or from the command line with a face recognition library.
pip install face_recognition
Next the imutils package (https://github.com/jrosebr1/imutils) needs to be installed. Matlotlib images easier with OpenCV and both Python 2.7 and Python 3.
Project Structure:
The media section of WordPress is a file that contains all the files for the Raspberry Pi.
This zip file needs to be copied onto the Pi and then unzipped. Use the cd command to get to the folder where the zip file is located and then unzip it with this command:
unzip pi-face-recognition.zip
The project has one directory with one sub-directorie:
dataset/ : This directory should contain sub-directories for each person you would like your facial recognition system to recognize.
- ian_malcolm/ : Pictures of Jurassic Park’s character, Ian Malcolm, are in this folder, but you’ll likely replace this directory with additional directories of people you’d like to recognize.
The folder for ian_malcolm is just an example for a dataset of photos. Just create a folder for every person you would like to recognize. In the media section of wordpress will also be a final version of the face recognition with a dataset containing four persons of our team.
There are also four files inside the main folder:
- encode_faces.py : This file will find faces in the dataset and encode them into 128-d vectors.
- encodings.pickle : The face encodings (128-d vectors, one for each face) are stored in this pickle file.
- haarcascade_frontalface_default.xml : In order to detect and localize faces in frames we rely on OpenCV’s pre-trained Haar cascade file.
- pi_face_recognition.py : This is the main execution script.
At first the face dataset should be gathered. It is possible to simply take a few photos of each person that should be recognized and save them in the corresponding folder in the dataset folder. It is not necessary to take a lot of photos of every person but the more photos you take the more accurate the face recognition will be. The photos should show the person in different distances and slightly different angles for better results. The disadvantage of more photos is that the time to recognize a face is slower because of the more comparisons.
Compute the face recognition embeddings
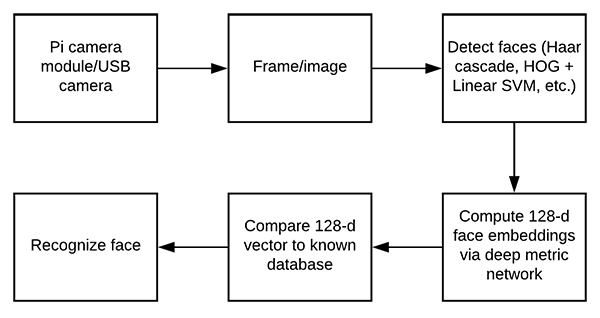
A deep neural network will be used to compute a 128-d vector (i.e., a list of 128 floating point values) that will quantify each face in the dataset. In another chapter it was already explained how the deep neural network performs face recognition but it will be explained here aswell.
The code of the python files will be explained step by step now. The full code is in the media section of wordpress.
Encode_faces.py:
#import the necessary packages
from imutils import paths
import face_recognition
import argparse
import pickle
import cv2
import os

# construct the argument parser and parse the arguments
ap = argparse.ArgumentParser()
ap.add_argument("-i", "--dataset", required=True,
                    help="path to input directory of faces + images")
ap.add_argument("-e", "--encodings", required=True,
                    help="path to serialized db of facial encodings")
ap.add_argument("-d", "--detection-method", type=str, default="cnn",
                    help="face detection model to use: either `hog` or `cnn`")

args = vars(ap.parse_args())
First, we need to import required packages. Notably, this script requires imutils, face_recognition , and OpenCV installed.
From there, we handle our command line arguments with argparse :
–dataset : The path to our dataset
–encodings : Our face encodings are written to the file that this argument points to.
–detection-method : Before we can encode faces in images we first need to detect them. Our two face detection methods include either hog or cnn . Those two flags are the only ones that will work for –detection-method .
Now that we’ve defined our arguments, let’s grab the paths to the images files in our dataset
# grab the paths to the input images in our dataset
print("[INFO] quantifying faces...")
imagePaths = list(paths.list_images(args["dataset"]))

# initialize the list of known encodings and known names
knownEncodings = []
knownNames = []
From there we’ll proceed to loop over each face in the dataset:

#loop over the image paths
for (i, imagePath) in enumerate(imagePaths):
                    # extract the person name from the image path
                    print("[INFO] processing image {}/{}".format(i + 1,
                                         len(imagePaths)))
                    name = imagePath.split(os.path.sep)[-2]

                    # load the input image and convert it from BGR (OpenCV ordering)
                    # to dlib ordering (RGB)
                    image = cv2.imread(imagePath)
                    rgb = cv2.cvtColor(image, cv2.COLOR_BGR2RGB)

                    # detect the (x, y)-coordinates of the bounding boxes
                    # corresponding to each face in the input image
                    boxes = face_recognition.face_locations(rgb,
                                         model=args["detection_method"])

                    # compute the facial embedding for the face
                    encodings = face_recognition.face_encodings(rgb, boxes)

                    # loop over the encodings
                    for encoding in encodings:
                                         # add each encoding + name to our set of known names and
                                         # encodings
                                         knownEncodings.append(encoding)
                                         knownNames.append(name)
Inside of the loop, we:
- Extract the person’s name from the path
- Load and convert the image to rgb
- Localize faces in the image.
- Compute face embeddings and add them to knownEncodings along with their name added to a corresponding list element in knownNames
Now export the facial encodings to disk so they can be used in the facial recognition script:
# dump the facial encodings + names to disk
print("[INFO] serializing encodings...")
data = {"encodings": knownEncodings, "names": knownNames}
f = open(args["encodings"], "wb")
f.write(pickle.dumps(data))
f.close()
- The second line constructs a dictionary with two keys — „encodings“ and „names“ . The values associated with the keys contain the encodings and names themselves.
- The data dictionary is then written to disk.
To create the facial embeddings open up a terminal and execute the command in the first line:
python encode_faces.py --dataset dataset --encodings encodings.pickle \
                    --detection-method hog

[INFO] quantifying faces...
[INFO] processing image 1/11
[INFO] processing image 2/11
[INFO] processing image 3/11
...
[INFO] processing image 9/11
[INFO] processing image 10/11
[INFO] processing image 11/11
[INFO] serializing encodings...
After running the script, you’ll have a pickle file at the disposal. It is named encodings.pickle — this file contains the 128-d face embeddings for each face in the dataset.
Recognize faces in video streams on your Raspberry Pi
In this script we used OpenCV’s Haar cascade to detect and localize the face.
Haar cascade:
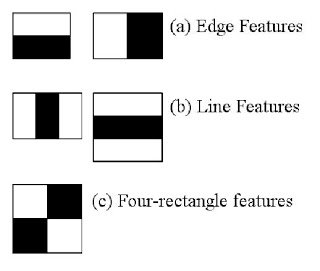
Haar-like features/Haar cascades, also known as the Viola-Jones algorithm, are digital image features used in object recognition. They owe their name to their intuitive similarity with Haar wavelets and were used in the first real-time face detector.
It’s a method to detect objects in images at multiple scales in realtime.
A simple rectangular Haar-like feature can be defined as the difference of the sum of pixels of areas inside the rectangle, which can be at any position and scale within the original image. This modified feature set is called 2-rectangle feature. There are also 3-rectangle features and 4-rectangle features. The values indicate certain characteristics of a particular area of the image. Each feature type can indicate the existence (or absence) of certain characteristics in the image, such as edges or changes in texture. For example, a 2-rectangle feature can indicate where the border lies between a dark region and a light region.
pi_face_recognition.py:
#import the necessary packages
from imutils.video import VideoStream
from imutils.video import FPS
import face_recognition
import argparse
import imutils
import pickle
import time
import cv2


# construct the argument parser and parse the arguments
ap = argparse.ArgumentParser()
ap.add_argument("-c", "--cascade", required=True,
                    help = "path to where the face cascade resides")
ap.add_argument("-e", "--encodings", required=True,
                    help="path to serialized db of facial encodings")
args = vars(ap.parse_args())
Import packages and parse command line arguments. Also importing two modules ( VideoStream and FPS ) from imutils as well as imutils itself. Also import face_recognition and cv2 (OpenCV). The rest of the modules listed are part of the Python installation.
then parse two command line arguments:
- –cascade : The path to OpenCV’s Haar cascade (included in the source code download).
- –encodings : The path to the serialized database of facial encodings. The encodings were just built in the previous section.
From there, instantiate several objects before beginning looping over frames from the camera:
# load the known faces and embeddings along with OpenCV's Haar
# cascade for face detection
print("[INFO] loading encodings + face detector...")
data = pickle.loads(open(args["encodings"], "rb").read())
detector = cv2.CascadeClassifier(args["cascade"])


# initialize the video stream and allow the camera sensor to warm up
print("[INFO] starting video stream...")
vs = VideoStream(src=0).start()
# vs = VideoStream(usePiCamera=True).start()
time.sleep(2.0)

# start the FPS counter
fps = FPS().start()
This block does:
- Load the facial encodings data.
- Instantiate the face detector using the Haar cascade method.
- Initialize the VideoStream — using a USB camera, but it is possible to use a PiCamera with the Pi, just comment the line: vs = VideoStream(src=0).start() and uncomment the line underneath it.
- Wait for the camera to warm up.
- Start the frames per second, fps , counter
From there, begin capturing frames from the camera and recognizing faces:
# loop over frames from the video file stream
while True:
                    # grab the frame from the threaded video stream and resize it
                    # to 500px (to speedup processing)
                    frame = vs.read()
                    frame = imutils.resize(frame, width=500)

                    # convert the input frame from (1) BGR to grayscale (for face
                    # detection) and (2) from BGR to RGB (for face recognition)
                    gray = cv2.cvtColor(frame, cv2.COLOR_BGR2GRAY)
                    rgb = cv2.cvtColor(frame, cv2.COLOR_BGR2RGB)

                    # detect faces in the grayscale frame
                    rects = detector.detectMultiScale(gray, scaleFactor=1.1,
                                         minNeighbors=5, minSize=(30, 30))


                    # OpenCV returns bounding box coordinates in (x, y, w, h) order
                    # but we need them in (top, right, bottom, left) order, so we
                    # need to do a bit of reordering
                    boxes = [(y, x + w, y + h, x) for (x, y, w, h) in rects]

                    # compute the facial embeddings for each face bounding box
                    encodings = face_recognition.face_encodings(rgb, boxes)
                    names = []
We proceed to grab a frame and preprocess it. The preprocessing steps include resizing followed by converting to grayscale and rgb
A method that is used in this code is the detectMultiScale method. The parameters included in this method are:
- gray : A grayscale image.
- scaleFactor : Parameter specifying how much the image size is reduced at each image scale.
- minNeighbors : Parameter specifying how many neighbors each candidate rectangle should have to retain it.
- minSize : Minimum possible object (face) size. Objects smaller than that are ignored.
The result of the face detection is rects, a list of face bounding box rectangles which correspond to the face locations in the. The coordinates get converted and reordered.
Now let’s loop over the face encodings and check for matches:
# loop over the facial embeddings
                    for encoding in encodings:
                                         # attempt to match each face in the input image to our known
                                         # encodings
                                         matches = face_recognition.compare_faces(data["encodings"],
                                                             encoding)
                                         name = "Unknown"

                                        # check to see if we have found a match
                                         if True in matches:
                                                             # find the indexes of all matched faces then initialize a
                                                             # dictionary to count the total number of times each face
                                                             # was matched
                                                             matchedIdxs = [i for (i, b) in enumerate(matches) if b]
                                                             counts = {}

                                                             # loop over the matched indexes and maintain a count for
                                                             # each recognized face face
                                                             for i in matchedIdxs:
                                                                                 name = data["names"][i]
                                                                                 counts[name] = counts.get(name, 0) + 1

                                                             # determine the recognized face with the largest number
                                                             # of votes (note: in the event of an unlikely tie Python
                                                             # will select first entry in the dictionary)
                                                             name = max(counts, key=counts.get)

                                         # update the list of names
                                         names.append(name)
The purpose of the code block above is to identify faces. Here we:
- Check for matches
- If matches are found a voting system is used to determine whose face it most likely is. This method works by checking which person in the dataset has the most matches (in the event of a tie, the first entry in the dictionary is selected).
From there, rectangles are simply drawn surrounding each face along with the predicted name of the person:
#  loop over the recognized faces
                    for ((top, right, bottom, left), name) in zip(boxes, names):
                                        # draw the predicted face name on the image
                                         cv2.rectangle(frame, (left, top), (right, bottom),
                                                             (0, 255, 0), 2)
                                         y = top - 15 if top - 15 > 15 else top + 15
                                         cv2.putText(frame, name, (left, y), cv2.FONT_HERSHEY_SIMPLEX,
                                                             0.75, (0, 255, 0), 2)


                    # display the image to our screen
                    cv2.imshow("Frame", frame)
                    key = cv2.waitKey(1) & 0xFF

                    # if the `q` key was pressed, break from the loop
                    if key == ord("q"):
                                  break
                    # update the FPS counter
                    fps.update()
After drawing the boxes and text, the image is displayed and checked if the quit (“q”) key is pressed. The fps-counter also gets updated.
And lastly, let’s clean up and write performance diagnostics to the terminal:
#stop the timer and display FPS information
fps.stop()
print("[INFO] elasped time: {:.2f}".format(fps.elapsed()))
print("[INFO] approx. FPS: {:.2f}".format(fps.fps()))

# do a bit of cleanup
cv2.destroyAllWindows()
vs.stop()
This is the final code for the Raspberry Pi face recognition. The script gets started with the following command(first and second line) in the terminal:
python pi_face_recognition.py --cascade haarcascade_frontalface_default.xml \
                    --encodings encodings.pickle
[INFO] loading encodings + face detector...
[INFO] starting video stream...
[INFO] elasped time: 20.78
[INFO] approx. FPS: 1.21
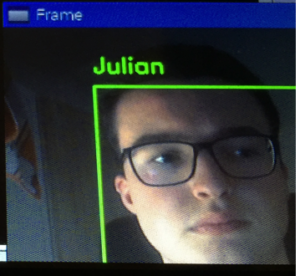
The [INFO] lines are the output. Also a window should open where the videostream of the camera can be seen. The problem here is that the Raspberry Pi does not have high enough computing power for this kind of face recognition and because of that the videostream is really laggy and only has below 10 fps.
The face recognition can be seen on the figure below. It detects a pre-learned face and adds the name to the face:
Raspberry Pi face recognition zip file
This zip file contains all the mentioned files for face recognition.