In this chapter the face recognition program gets expanded. The face recognition was already discussed in another chapter. In this chapter the full code is shown in red color. These lines of code are responsible for sending a message to the IoT hub:
# python pi_face_recognition.py --cascade haarcascade_frontalface_default.xml --encodings encodings.pickle
# import the necessary packages
from imutils.video import VideoStream
from imutils.video import FPS
import face_recognition
import argparse
import imutils
import pickle
import time
import cv2
import sys
import random
# Using the Python Device SDK for IoT Hub:
# https://github.com/Azure/azure-iot-sdk-python
# The sample connects to a device-specific MQTT endpoint on your IoT hub.import iothub_client from iothub_client import IoTHubClient, IoTHubClientError, IoTHubTransportProvider, IoTHubClientResult from iothub_client import IoTHubMessage, IoTHubMessageDispositionResult, IoTHubError, DeviceMethodReturnValue
### imports finished ###
# construct the argument and parse the arguments
ap = argparse.ArgumentParser ()
ap.add_argument ("- c", "--cascade", required = True,
help = "path to where the face cascade resides")
ap.add_argument ("- e", "--encodings", required = True,
help = "path to serialized db of facial encodings")
args = vars (ap.parse_args ())
# The device connection string to authenticate the device with your IoT hub.
# Using the Azure CLI:
# az iot hub device-identity show-connection-string --hub-name {YourIoTHubName} --device-id MyNodeDevice --output tableCONNECTION_STRING = "HostName = TeamProject.azure-devices.net; DeviceId = RaspberryPi; SharedAccessKey = Wg + ELbLF5 / mwS2mWWmBEl0x0NoGK5bCF9 + KloXcQrZo ="# Using the MQTT protocol. PROTOCOL = IoTHubTransportProvider.MQTT MESSAGE_TIMEOUT = 10000# Define the JSON default message to send to IoT Hub. MSG_TXT = "You should not see this"#Functions for sending the message def_confirmation_callback (message, result, user_context): print ("IoT Hub responded to message with status:% s"% (result))def iothub_client_init (): # Create to IoT Hub client client = IoTHubClient (CONNECTION_STRING, PROTOCOL) return clientdef iothub_client_telemetry_sample_run (): try: client = iothub_client_init () # Build the message with simulated telemetry values. message = IoTHubMessage (MSG_TXT) # Add a custom application property to the message. # An IoT hub can filter these properties without accessing the message body. # prop_map = message.properties () # if temperature> 30: # prop_map.add ("temperatureAlert", "true") #else: # prop_map.add ("temperatureAlert", "false") # Send the message. print ("Sending message:% s"% message.get_string ()) client.send_event_async (message, send_confirmation_callback, None) time.sleep (1) except IoTHubError as iothub_error: print ("Unexpected error% s from IoTHub"% iothub_error) return ### End functions for sending message ###
# load the known faces and embeddings along with OpenCV's Haircascade
#for face detection
print ("[INFO] loading encodings + face detector ...")
data = pickle.loads (open (args ["encodings"], "rb"). read ())
detector = cv2.CascadeClassifier (args ["cascade"])
#initialize the video stream and allow the camera to warm up
print ("[INFO] starting video stream ...")
vs = VideoStream (src = 0) .start ()
# vs = VideoStream (usePiCamera = True) .start ()
time.sleep (2.0)
# start the FPS counter
fps = FPS (). start ()
# loop over frames from the video file stream
while true:
# grab the frame from the threaded video stream and resize it
# to 500px (to speedup processing)
frame = vs.read ()
frame = imutils.resize (frame, width = 500)
# convert the input frame from (1) BGR to grayscale (for face
# detection) and (2) from BGR to RGB (for face recognition)
gray = cv2.cvtColor (frame, cv2.COLOR_BGR2GRAY)
rgb = cv2.cvtColor (frame, cv2.COLOR_BGR2RGB)
# detect faces in the grayscale frame
rects = detector.detectMultiScale (gray, scaleFactor = 1.1,
minNeighbors = 5, minSize = (30, 30),
flags = cv2.CASCADE_SCALE_IMAGE)
# OpenCV returns bounding box coordinates in (x, y, w, h) order
# but we need them in (top, right, bottom, left) order, so we
# need to do a bit of reordering
boxes = [(y, x + w, y + h, x) for (x, y, w, h) in rects]
#compute the facial embeddings for each face bounding box
encodings = face_recognition.face_encodings (rgb, boxes)
names = []
# loop over the facial embeddings
for encoding in encodings:
# attempt to match each face in the image image to our known
# encodings
matches = face_recognition.compare_faces (data ["encodings"]),
encoding)
name = "Unknown"
# check to see if we have found a match
if true in matches:
# find the indexes of all matched faces then initialize a
# dictionary to count the total number of times each face
# what matched
matchedIdxs = [i for (i, b) in enumerate (matches) if b]
counts = {}
# loop over the matched indexes and maintain a count for
# each recognized face face
for i in matchedIdxs:
name = data ["names"] [i]
counts [name] = counts.get (name, 0) + 1
# determine the recognized face with the largest number
# of votes (note: in the event of an unlikely tie Python
# wants to select first entry in the dictionary)
name = max (counts, key = counts.get)# Define the JSON message to send to IoT Hub. MSG_TXT = "% s detected"% (name)
# update the list of names
names.append (name)
# loop over the recognized faces
for ((top, right, bottom, left), name) in zip (boxes, names):
# draw the predicted face name on the image
cv2.rectangle (frame, (left, top), (right, bottom),
(0, 255, 0), 2)
y = top - 15 if top - 15> 15 else top + 15
cv2.putText (frame, name, (left, y), cv2.FONT_HERSHEY_SIMPLEX,
0.75, (0, 255, 0), 2)#send message to IOT HUB iothub_client_telemetry_sample_run ()
# display the image to our screen
cv2.imshow ("Frame", frame)
key = cv2.waitKey (1) & 0xFF
# if the `q` key was pressed, break from the loop
if key == ord ("q"):
break
# update the FPS counter
fps.update ()
# stop the timer and display FPS information
fps.stop ()
print ("[INFO] elasped time: {: .2f}". format (fps.elapsed ()))
print ("[INFO] approx. FPS: {: .2f}". format (fps.fps ()))
#do a bit of cleanup
cv2.destroyAllWindows ()
vs.stop ()
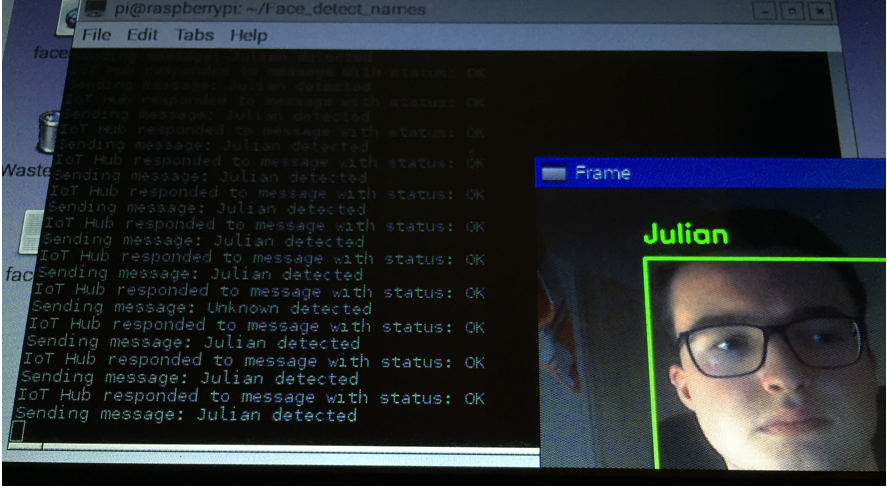
This code creates a connection to the IoT hub via the connection string, using the device in my IoT Hub which is named „RaspberryPi“. Whenever a face is recognized a message is sent to the IoT hub attached to a storage container. The IoT hub then sends back an acknowledgment whether or not the status of the message is OK.
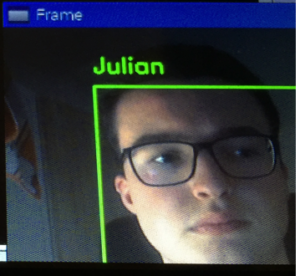
Sending message to IoT hub when face recognized
In the picture above you can see that a message is sent to the IoT hub whenever a face is detected. The message contains the name of the person detected.
IMPORTANT:
Here it is important to note that the messaging only works if the azure SDKs are installed. Another known problem is that the connection to the IoT hub only works if iothub_client.so file is in the same folder where the face recognition python file is. This iothub_client.so file can be located in the folder azure-iot-sdk-python\c\cmake\iotsdk_linux\python\src.
Because of that error I put the azure-iot-sdk-python folder in the same folder where the face recognition is saved. I also copied the iothub_client.so file and put it in there. After these changes the code worked.
Final Raspberry Pi face recognition with IoT Hub message
The zip file above is the final version of the program. In the folder is already the iothub_client.so file. The whole azure-iot-sdk-python folder was too big to upload.
In the folder is therefore a command file which shows the command to start the program.
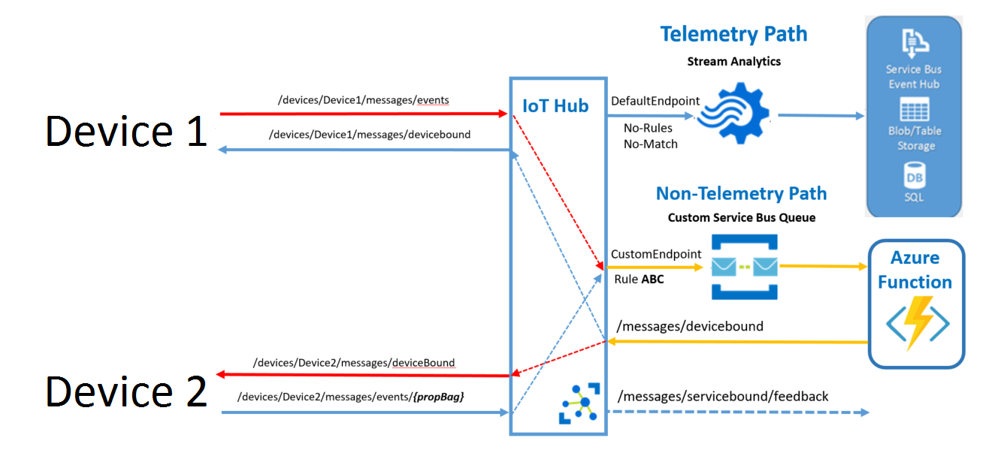
In the figure above the principal device to device communication with IoT hub can be seen. The goal for this project is to send a message from one device to another device. The Raspberry Pi sends a message to the Philipps Hue when he sees the Raspberry Pi face recognition program. The Philipps Hue receives the message and changes the color according to the recognized person.
This messaging process needs to be done in combination with the IoT Hub. In detail a message from the Raspberry Pi (Device 1) is sent to a custom endpoint of the IoT Hub. This message is stored in a service bus queue or a storage container or something similar and then processed by an azure function or logic app which establishes a connection with the target device (Device 2).
In this project it is possible to create a face recognition with the raspberry pi and when a face gets detected a message is sent to the IoT hub. It’s possible to send messages from the IoT hub to the raspberry pi. But it could not be possible to create a device to message message, even though a message could be stored in a storage container and the logic app could react to this message.
Raspberry Pi. This means the Raspberry Pi is ready to be recognized with the Raspberry Pi if a pre-learned person is detected, the person’s name will be shown on the person’s head on the screen. The program can thus detect unknown persons and will label them as search.
At first OpenCv should be installed which is explained in another chapter.
After that it is necessary to install the dlib toolkit (http://dlib.net/). Dlib is a modern C ++ toolkit containing machine learning algorithms and tools for creating complex software in C ++ to solve real world problems. The Dlib toolkit contains features like deep learning which is important for face recognition.
pip install dlib
Furthermore, Adam Geitgey’s face_recognition module (https://github.com/ageitgey/face_recognition) which uses, which uses the dlib toolkit. The face_recognition module recognizes and manipulates faces from Python or from the command line with a face recognition library.
pip install face_recognition
Next the imutils package (https://github.com/jrosebr1/imutils) needs to be installed. Matlotlib images easier with OpenCV and both Python 2.7 and Python 3.
Project Structure:
The media section of WordPress is a file that contains all the files for the Raspberry Pi.
This zip file needs to be copied onto the Pi and then unzipped. Use the cd command to get to the folder where the zip file is located and then unzip it with this command:
unzip pi-face-recognition.zip
The project has one directory with one sub-directorie:
dataset/ : This directory should contain sub-directories for each person you would like your facial recognition system to recognize.
ian_malcolm/ : Pictures of Jurassic Park’s character, Ian Malcolm, are in this folder, but you’ll likely replace this directory with additional directories of people you’d like to recognize.
The folder for ian_malcolm is just an example for a dataset of photos. Just create a folder for every person you would like to recognize. In the media section of wordpress will also be a final version of the face recognition with a dataset containing four persons of our team.
There are also four files inside the main folder:
encode_faces.py : This file will find faces in the dataset and encode them into 128-d vectors.
encodings.pickle : The face encodings (128-d vectors, one for each face) are stored in this pickle file.
haarcascade_frontalface_default.xml : In order to detect and localize faces in frames we rely on OpenCV’s pre-trained Haar cascade file.
pi_face_recognition.py : This is the main execution script.
At first the face dataset should be gathered. It is possible to simply take a few photos of each person that should be recognized and save them in the corresponding folder in the dataset folder. It is not necessary to take a lot of photos of every person but the more photos you take the more accurate the face recognition will be. The photos should show the person in different distances and slightly different angles for better results. The disadvantage of more photos is that the time to recognize a face is slower because of the more comparisons.
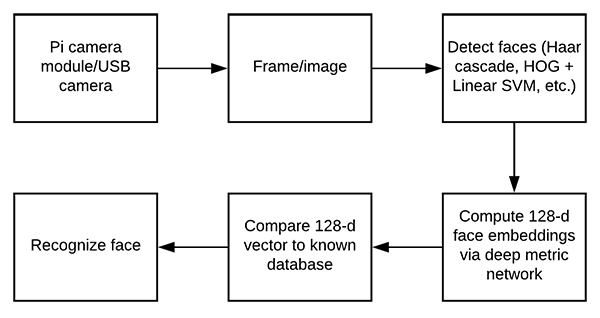
Compute the face recognition embeddings
Figure : Beginning with capturing input frames from the Raspberry Pi, the workflow consists of detecting faces, computing embeddings, and comparing the vector to the database via a voting method. OpenCV, dlib, and face_recognition are required for this face recognition method.
A deep neural network will be used to compute a 128-d vector (i.e., a list of 128 floating point values) that will quantify each face in the dataset. In another chapter it was already explained how the deep neural network performs face recognition but it will be explained here aswell.
The code of the python files will be explained step by step now. The full code is in the media section of wordpress.
Encode_faces.py:
#import the necessary packages
from imutils import paths
import face_recognition
import argparse
import pickle
import cv2
import os

# construct the argument parser and parse the arguments
ap = argparse.ArgumentParser()
ap.add_argument("-i", "--dataset", required=True,
                    help="path to input directory of faces + images")
ap.add_argument("-e", "--encodings", required=True,
                    help="path to serialized db of facial encodings")
ap.add_argument("-d", "--detection-method", type=str, default="cnn",
                    help="face detection model to use: either `hog` or `cnn`")

args = vars(ap.parse_args())
First, we need to import required packages. Notably, this script requires imutils, face_recognition , and OpenCV installed.
From there, we handle our command line arguments with argparse :
–dataset : The path to our dataset
–encodings : Our face encodings are written to the file that this argument points to.
–detection-method : Before we can encode faces in images we first need to detect them. Our two face detection methods include either hog or cnn . Those two flags are the only ones that will work for –detection-method .
Now that we’ve defined our arguments, let’s grab the paths to the images files in our dataset
# grab the paths to the input images in our dataset
print("[INFO] quantifying faces...")
imagePaths = list(paths.list_images(args["dataset"]))

# initialize the list of known encodings and known names
knownEncodings = []
knownNames = []
From there we’ll proceed to loop over each face in the dataset:

#loop over the image paths
for (i, imagePath) in enumerate(imagePaths):
                    # extract the person name from the image path
                    print("[INFO] processing image {}/{}".format(i + 1,
                                         len(imagePaths)))
                    name = imagePath.split(os.path.sep)[-2]

                    # load the input image and convert it from BGR (OpenCV ordering)
                    # to dlib ordering (RGB)
                    image = cv2.imread(imagePath)
                    rgb = cv2.cvtColor(image, cv2.COLOR_BGR2RGB)

                    # detect the (x, y)-coordinates of the bounding boxes
                    # corresponding to each face in the input image
                    boxes = face_recognition.face_locations(rgb,
                                         model=args["detection_method"])

                    # compute the facial embedding for the face
                    encodings = face_recognition.face_encodings(rgb, boxes)

                    # loop over the encodings
                    for encoding in encodings:
                                         # add each encoding + name to our set of known names and
                                         # encodings
                                         knownEncodings.append(encoding)
                                         knownNames.append(name)
Inside of the loop, we:
Extract the person’s name from the path
Load and convert the image to rgb
Localize faces in the image.
Compute face embeddings and add them to knownEncodings along with their name added to a corresponding list element in knownNames
Now export the facial encodings to disk so they can be used in the facial recognition script:
# dump the facial encodings + names to disk
print("[INFO] serializing encodings...")
data = {"encodings": knownEncodings, "names": knownNames}
f = open(args["encodings"], "wb")
f.write(pickle.dumps(data))
f.close()
The second line constructs a dictionary with two keys — „encodings“ and „names“ . The values associated with the keys contain the encodings and names themselves.
The data dictionary is then written to disk.
To create the facial embeddings open up a terminal and execute the command in the first line:
After running the script, you’ll have a pickle file at the disposal. It is named encodings.pickle — this file contains the 128-d face embeddings for each face in the dataset.
Recognize faces in video streams on your Raspberry Pi
In this script we used OpenCV’s Haar cascade to detect and localize the face.
Haar cascade:
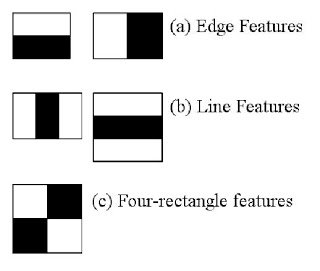
Haar-like features/Haar cascades, also known as the Viola-Jones algorithm, are digital image features used in object recognition. They owe their name to their intuitive similarity with Haar wavelets and were used in the first real-time face detector.
It’s a method to detect objects in images at multiple scales in realtime.
A simple rectangular Haar-like feature can be defined as the difference of the sum of pixels of areas inside the rectangle, which can be at any position and scale within the original image. This modified feature set is called 2-rectangle feature. There are also 3-rectangle features and 4-rectangle features. The values indicate certain characteristics of a particular area of the image. Each feature type can indicate the existence (or absence) of certain characteristics in the image, such as edges or changes in texture. For example, a 2-rectangle feature can indicate where the border lies between a dark region and a light region.
Haar cascade examples
pi_face_recognition.py:
#import the necessary packages
from imutils.video import VideoStream
from imutils.video import FPS
import face_recognition
import argparse
import imutils
import pickle
import time
import cv2


# construct the argument parser and parse the arguments
ap = argparse.ArgumentParser()
ap.add_argument("-c", "--cascade", required=True,
                    help = "path to where the face cascade resides")
ap.add_argument("-e", "--encodings", required=True,
                    help="path to serialized db of facial encodings")
args = vars(ap.parse_args())
Import packages and parse command line arguments. Also importing two modules ( VideoStream and FPS ) from imutils as well as imutils itself. Also import face_recognition and cv2 (OpenCV). The rest of the modules listed are part of the Python installation.
then parse two command line arguments:
–cascade : The path to OpenCV’s Haar cascade (included in the source code download).
–encodings : The path to the serialized database of facial encodings. The encodings were just built in the previous section.
From there, instantiate several objects before beginning looping over frames from the camera:
# load the known faces and embeddings along with OpenCV's Haar
# cascade for face detection
print("[INFO] loading encodings + face detector...")
data = pickle.loads(open(args["encodings"], "rb").read())
detector = cv2.CascadeClassifier(args["cascade"])


# initialize the video stream and allow the camera sensor to warm up
print("[INFO] starting video stream...")
vs = VideoStream(src=0).start()
# vs = VideoStream(usePiCamera=True).start()
time.sleep(2.0)

# start the FPS counter
fps = FPS().start()
This block does:
Load the facial encodings data.
Instantiate the face detector using the Haar cascade method.
Initialize the VideoStream — using a USB camera, but it is possible to use a PiCamera with the Pi, just comment the line: vs = VideoStream(src=0).start() and uncomment the line underneath it.
Wait for the camera to warm up.
Start the frames per second, fps , counter
From there, begin capturing frames from the camera and recognizing faces:
# loop over frames from the video file stream
while True:
                    # grab the frame from the threaded video stream and resize it
                    # to 500px (to speedup processing)
                    frame = vs.read()
                    frame = imutils.resize(frame, width=500)

                    # convert the input frame from (1) BGR to grayscale (for face
                    # detection) and (2) from BGR to RGB (for face recognition)
                    gray = cv2.cvtColor(frame, cv2.COLOR_BGR2GRAY)
                    rgb = cv2.cvtColor(frame, cv2.COLOR_BGR2RGB)

                    # detect faces in the grayscale frame
                    rects = detector.detectMultiScale(gray, scaleFactor=1.1,
                                         minNeighbors=5, minSize=(30, 30))


                    # OpenCV returns bounding box coordinates in (x, y, w, h) order
                    # but we need them in (top, right, bottom, left) order, so we
                    # need to do a bit of reordering
                    boxes = [(y, x + w, y + h, x) for (x, y, w, h) in rects]

                    # compute the facial embeddings for each face bounding box
                    encodings = face_recognition.face_encodings(rgb, boxes)
                    names = []
We proceed to grab a frame and preprocess it. The preprocessing steps include resizing followed by converting to grayscale and rgb
A method that is used in this code is the detectMultiScale method. The parameters included in this method are:
gray : A grayscale image.
scaleFactor : Parameter specifying how much the image size is reduced at each image scale.
minNeighbors : Parameter specifying how many neighbors each candidate rectangle should have to retain it.
minSize : Minimum possible object (face) size. Objects smaller than that are ignored.
The result of the face detection is rects, a list of face bounding box rectangles which correspond to the face locations in the. The coordinates get converted and reordered.
Now let’s loop over the face encodings and check for matches:
# loop over the facial embeddings
                    for encoding in encodings:
                                         # attempt to match each face in the input image to our known
                                         # encodings
                                         matches = face_recognition.compare_faces(data["encodings"],
                                                             encoding)
                                         name = "Unknown"

                                        # check to see if we have found a match
                                         if True in matches:
                                                             # find the indexes of all matched faces then initialize a
                                                             # dictionary to count the total number of times each face
                                                             # was matched
                                                             matchedIdxs = [i for (i, b) in enumerate(matches) if b]
                                                             counts = {}

                                                             # loop over the matched indexes and maintain a count for
                                                             # each recognized face face
                                                             for i in matchedIdxs:
                                                                                 name = data["names"][i]
                                                                                 counts[name] = counts.get(name, 0) + 1

                                                             # determine the recognized face with the largest number
                                                             # of votes (note: in the event of an unlikely tie Python
                                                             # will select first entry in the dictionary)
                                                             name = max(counts, key=counts.get)

                                         # update the list of names
                                         names.append(name)
The purpose of the code block above is to identify faces. Here we:
Check for matches
If matches are found a voting system is used to determine whose face it most likely is. This method works by checking which person in the dataset has the most matches (in the event of a tie, the first entry in the dictionary is selected).
From there, rectangles are simply drawn surrounding each face along with the predicted name of the person:
#  loop over the recognized faces
                    for ((top, right, bottom, left), name) in zip(boxes, names):
                                        # draw the predicted face name on the image
                                         cv2.rectangle(frame, (left, top), (right, bottom),
                                                             (0, 255, 0), 2)
                                         y = top - 15 if top - 15 > 15 else top + 15
                                         cv2.putText(frame, name, (left, y), cv2.FONT_HERSHEY_SIMPLEX,
                                                             0.75, (0, 255, 0), 2)


                    # display the image to our screen
                    cv2.imshow("Frame", frame)
                    key = cv2.waitKey(1) & 0xFF

                    # if the `q` key was pressed, break from the loop
                    if key == ord("q"):
                                  break
                    # update the FPS counter
                    fps.update()
After drawing the boxes and text, the image is displayed and checked if the quit (“q”) key is pressed. The fps-counter also gets updated.
And lastly, let’s clean up and write performance diagnostics to the terminal:
#stop the timer and display FPS information
fps.stop()
print("[INFO] elasped time: {:.2f}".format(fps.elapsed()))
print("[INFO] approx. FPS: {:.2f}".format(fps.fps()))

# do a bit of cleanup
cv2.destroyAllWindows()
vs.stop()
This is the final code for the Raspberry Pi face recognition. The script gets started with the following command(first and second line) in the terminal:
The [INFO] lines are the output. Also a window should open where the videostream of the camera can be seen. The problem here is that the Raspberry Pi does not have high enough computing power for this kind of face recognition and because of that the videostream is really laggy and only has below 10 fps.
The face recognition can be seen on the figure below. It detects a pre-learned face and adds the name to the face:
OpenCV (Open Source Computer Vision) is a library of programming functions primarily aimed at real-time computer vision. OpenCV supports the deep learning frameworks TensorFlow, Torch / PyTorch and Caffe. Especially deep learning and Caffe is important in this Raspberry Pi project.
Install OpenCV
The first thing you should do is expand your filesystem to include all available space on your micro-SD card:
sudo raspi-config
Once prompted, you should select the first option, „1. Expand File System, hit Enter on your keyboard, arrow down to the „<Finish>“ button, and then reboot your Pi:
sudo reboot
After rebooting, your file system should have all available space on your micro-SD card. You can verify that the disk has been expanded by executing df -h and examining the output:
df -h
The size of the filesystem should be almost the same size as the size of the SD card.
Install dependencies
The first step is to update and upgrade any existing packages:
Next, we need to install some image I/O packages that allow us to load various image file formats from disk. Examples of such file formats include JPEG, PNG, TIFF, etc.:
Just as we need image I/O packages, we also need video I/O packages. These libraries allow us to read various video file formats from disk as well as work directly with video streams:
The OpenCV library comes with a sub-module named highgui which is used to display images to our screen and build basic GUIs. In order to compile the highgui module, we need to install the GTK development library:
sudo apt-get install libgtk2.0-dev
Many operations inside of OpenCV (namely matrix operations) can be optimized further by installing a few extra dependencies:
sudo apt-get install libatlas-base-dev gfortran
These optimization libraries are especially important for resource constrained devices such as the Raspberry Pi.
Lastly, install the Python 2.7 or Python 3 header files, depending which Pyhton version you want to use. In this project we used 2.7:
sudo apt-get install python2.7-dev
OR
sudo apt-get install python3-dev
Download the OpenCV source code
Now it its necessary to install the desired version archive of OpenCV from the official OpenCV repository. In this case we took the version 3.4.1. The most recent version can be seen on the OpenCV website: https://opencv.org/
cd ~
wget -O opencv.zip https://github.com/Itseez/opencv/archive/3.4.1.zip
unzip opencv.zip
We wanted the full install of OpenCV 3 so we also needed to grab the opencv_contrib repository as well:
Start by scrolling down the section titled Python 2 and Python 3 .
If you are compiling OpenCV 3 for Python 2.7, then make sure your Python 2 section includes valid paths to the Interpreter , Libraries , numpy and packages path.
Finally, it is possible to compile OpenCV:
make -j4
The -j4 command controls the number of cores to leverage when compiling OpenCV 3
This step can take hours to finish.
After that OpenCv can be installed:
sudo make install
sudo ldconfig
OpenCv should be installed now on the Raspberry Pi 3. To verify this use the ls command.
For python 2.7:
ls -l /usr/local/lib/python2.7/site-packages/
In some cases, OpenCV can be installed in /usr/local/lib/python2.7/dist-packages (note the dist-packages rather than site-packages . If you do not find the cv2.so bindings in site-packages , be sure to check dist-packages .
IoT Hub enables you to route device-to-cloud messages to IoT Hub service-facing endpoints based on message properties. Routing rules give you the flexibility to send messages where you need to go without the need for additional services or custom code. Each routing rule you configure has the following properties:
Property
description
Surname
The unique name that identifies the rule.
source
The origin of the data stream to be acted upon. For example, device telemetry.
Condition
The query expression for the routing rule that is against the message’s headers and body and determines if it is a match for the endpoint. For more information about constructing a route condition, see the Reference – query language for device twins and jobs .
Endpoint
The name of the endpoint where IoT Hub sends messages that match the condition. Endpoints should be in the same region as the IoT hub, otherwise you may be charged for cross-region writes.
Endpoints and routing (to Azure Storage Container)
IoT hub has a default built-in endpoint. You can create custom endpoints to link to other services in your subscription to the hub. IoT Hub currently supports Azure storage containers, event hubs, service bus queues, and service bus topics as custom endpoints.
When you use routing and custom endpoints, messages are only delivered to the built-in endpoint. To deliver messages to the built-in endpoint as well as to a custom endpoint, add a route did sends messages to the events endpoint.
This means you have to create a route and a custom endpoint in the IoT Hub to send a message to a specific destination.
In this project we used Azure Storage Container as an endpoint. The purpose of this storage container is to send the message to the end user of the Raspberry Pi Container.
Azure Storage Container / Account
Azure storage account provides a unique namespace to store and access your Azure Storage data objects.
General-purpose storage accounts
A general-purpose storage account gives you access to Azure storage services such as tables, queues, files, blobs and azure virtual machines disks under a single account.
Blob Storage Accounts
A Blob storage account is a specialized storage account for storing your unstructured data as blobs (objects) in Azure Storage. Blob storage accounts are similar to existing general-purpose storage accounts and share all the great durability, availability, scalability, and performance features that you use today including 100% API consistency for block blobs and append blobs. For applications requiring only block or append blob storage, it is recommend using Blob storage accounts.
In this project it does not matter which type of storage account you use.
Creating a Storage Account
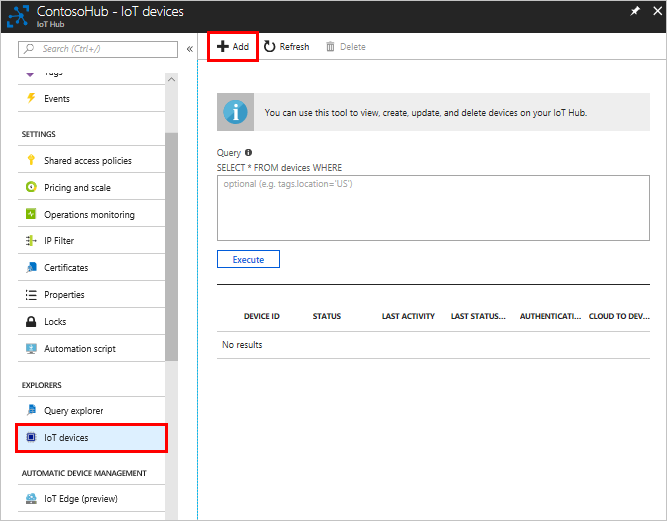
In the Azure portal, expand the menu on the left side to open the menu of services, and choose More Services. Then, scroll down to Storage, and choose Storage accounts. On the Storage Accounts window that appears, choose Add.
Enter a name for your storage account.
Specify the deployment model to be used: Resource Manager or Classic. Resource Manager is the recommended deployment model.
Select the type of storage account: General purpose or Blob storage. General purpose is the default.
Select the replication option for the storage account: LRS, GRS, RA-GRS, or ZRS. The default is RA-GRS. If RA-GRS does not work, try LRS. LRS worked in this project.
Select the subscription in which you want to create the new storage account.
Specify a new resource group or select an existing resource group.You should use your existing resource group.
Select the geographic location for your storage account. Here you should use Europe-West/ West Europe.
Click Create to create the storage account.
Set up message routing
You are going to route messages to different resources based on properties attached to the message by the simulated device. Messages that are not custom routed are sent to the default endpoint (messages/events). This means in this project it was necessary to create a custom endpoint for the storage container.
To create this route to the storage account it is necessary to define an endpoint, and then set up a route for that endpoint. This is done like this:
In the Azure portal, click Resource Groups, then select your resource group. This tutorial uses ContosoResources. Click the IoT hub under the list of resources. This tutorial uses ContosoTestHub. Click Endpoints. In the Endpointspane, click +Add. Enter the following information:
Name: Enter a name for the endpoint. This tutorial uses StorageContainer.
Endpoint Type: Select Azure Storage Container from the dropdown list.
Click Pick a container to see the list of storage accounts. Select your storage account. In the following example picture the name of the storage account is contosostorage. Next, select the container. This tutorial uses contosoresults. Click Select, which returns you to the Add endpoint pane
After these steps the endpoint is created and links to the storage account.
Now a route to this endpoint had to be created. To create a route to the following:
Click Routes on your IoT hub. You’re going to create a routing rule that routes messages to the storage container you just added as an endpoint. Click +Add at the top of the Routes pane. Fill in the fields on the screen.
Name: Enter a name for your routing rule. This tutorial uses StorageRule.
Data source: Select Device Messages (in this project these are the Raspberry Pi messages) from the dropdown list.
As Query string there are following possibilities:
value
Result
level=“storage“
Write to Azure Storage.
level=“critical“
Write to a Service Bus queue. A Logic App can access a Service Bus queue.
default
Display this data using Power BI.
This means in this case we have to choose “storage” as Query string to create a route to an storage account.
Click Save. When it finishes, it returns to the Routes pane, where you can see your new routing rule for storage.
The route is now finished and whenever a message is sent from the chosen device the message will be sent to the storage account and is stored there. On the picture above you can see the blob file name format in which the blob will be saved and how it will be named.
The sent files can be found in your Microsoft Azure. Expand the menu on the left and click on Storage Accounts . Select your storage account and click on blobs on the now opened main page. A new page will open with your created storage container. Click on your container and you will find a directory in the form of the blob file name format. There are all the files saved and you can download them to see the content. Alternatively you can download the Microsoft Azure Storage Explorer and open the files with this tool.
With Azure IoT It is possible to fully secure and secure bi-directional communications between millions of devices and a solution back end.
Microsoft is offering an example to test the cloud to device messaging. If you need to have this example you need to have python 2.x or 3.x installed on the Raspberry Pi. So you need the Visual C ++ redistribution package:
This SimulatedDevice.py file connects to your IoT hub and receives cloud-to-device messages. This means if you run this file on your Raspberry Pi it will detect when a message is send from the IoT Hub to your Raspberry Pi.
Now you create a Python console app that sends cloud-to-device messages to the simulated device app. Microsoft also has an example for this case:
Using a text editor, create a SendCloudToDeviceMessage.pyfile.
Add the following importstatements and variables at the start of the SendCloudToDeviceMessage.py file:
import random
import sys
import iothub_service_client
from iothub_service_client import IoTHubMessaging, IoTHubMessage, IoTHubError


OPEN_CONTEXT = 0
FEEDBACK_CONTEXT = 1
MESSAGE_COUNT = 1
AVG_WIND_SPEED = 10.0
MSG_TXT = "{\"service client sent a message\": %.2f}"
Add the following code to pyfile. Replace the „{IoTHubConnectionString}“ placeholder value with the IoT Hub connection string for the hub you created and replace the „{deviceId}“ placeholder with the device ID of the device you added in the previous steps.
Add the following function to print feedback messages to the console:
def open_complete_callback(context):
    print ( 'open_complete_callback called with context: {0}'.format(context) )

def send_complete_callback(context, messaging_result):
    context = 0
    print ( 'send_complete_callback called with context : {0}'.format(context) )
    print ( 'messagingResult : {0}'.format(messaging_result) )
Add the following code to send a message to your device and handle the feedback message when the device acknowledges the cloud-to-device message:
def iothub_messaging_sample_run():
    try:

        iothub_messaging = IoTHubMessaging(CONNECTION_STRING)
        iothub_messaging.open(open_complete_callback, OPEN_CONTEXT)

        for i in range(0, MESSAGE_COUNT):
            print ( 'Sending message: {0}'.format(i) )
            msg_txt_formatted = MSG_TXT % (AVG_WIND_SPEED + (random.random() * 4 + 2))
            message = IoTHubMessage(bytearray(msg_txt_formatted, 'utf8'))

            # optional: assign ids
            message.message_id = "message_%d" % i
            message.correlation_id = "correlation_%d" % i
            # optional: assign properties
            prop_map = message.properties()
            prop_text = "PropMsg_%d" % i
            prop_map.add("Property", prop_text)
            iothub_messaging.send_async(DEVICE_ID, message, send_complete_callback, i)

        try:
            # Try Python 2.xx first
            raw_input("Press Enter to continue...\n")

        except:
            pass
            # Use Python 3.xx in the case of exception
            input("Press Enter to continue...\n")

        iothub_messaging.close()

    except IoTHubError as iothub_error:
        print ( "Unexpected error {0}" % iothub_error )
        return
    except KeyboardInterrupt:
        print ( "IoTHubMessaging sample stopped" )
Add the following main function:
if __name__ == '__main__':
    print ( "Starting the IoT Hub Service Client Messaging Python sample..." )
    print ( "    Connection string = {0}".format(CONNECTION_STRING) )
    print ( "    Device ID         = {0}".format(DEVICE_ID) )
    iothub_messaging_sample_run()
Now you have to run the applications on your Raspberry Pi. To do this you have to open a new command prompt/terminal and run the following command to listen for cloud-to-device messages:
python SimulatedDevice.py
After that open a new command prompt and run the following command to send a cloud-to-device message and wait for the message feedback:
python SendCloudToDeviceMessage.py
But the moment you start the SendCloudToDeviceMessage.py app you can see a change in the prompt command promptly where you started the SimulatedDevice.py app.
If pip is not already installed use this command to install it:
For python3:
sudo apt-get install python3-pip
For python2:
sudo apt-get install python-pip
But the installation should probably be done like this:
Build the Azure IoT Hub SDKs for Python on Linux
Installs needed to compile the SDKs for Python from souce code
Because the Azure IoT SDKs for Python are wrappers on top of the SDKs for C, you will need to compile the C libraries if you want or need to generate the Python libraries from source code. You will notice that the C SDKs are brought in as submodules to the current repository. In order to setup your development environment to build the C binaries, you need to follow the instructions here:
The Python iothub_client and iothub_service_client modules support python versions 2.7.x, 3.4.x, 3.5.x or 3.6.x. Know the appropriate version you would like to build the library with for the following instructions.
Ensure that the desired Python version (2.7.x, 3.4.x, 3.5.x or 3.6.x) is installed and active. Run python --version or python3 --version at the command line to check the version.
Open a shell and navigate to the folder build_all/linux in your local copy of the repository.
Run the ./setup.sh script to install the prerequisite packages and the dependent libraries.
Setup will default to python 2.7
To setup dependencies for python version greater than 3, run ./setup.sh --python-version X.Y where „X.Y“ is the python version (e.g. 3.4, 3.5 or 3.6)
Run the ./build.sh script.
Build will default to python 2.7
To build with python version greater than 3, run ./build.sh --build-python X.X where „X.Y“ is the python version (e.g. 3.4, 3.5 or 3.6)
After a successful build, the iothub_client.so Python extension module is copied to the device / samples and service / samples folders. Visit these folders for instructions on how to run the samples.
„Welcome“ may sound like a strange name for Netatmo’s Web-enabled security camera, but the camera expresses the camera’s purpose: „There’s always something at the front door to welcome invited guests, and the proper authorities to any unwanted activity.“
The Welcome performs the basic features of a home security camera well, without a lot of bells and whistles – except for the actual whistles that comes with your computer or smartphone. Its truly unique feature is remarkably well.
Welcome to indoor camera with face recognition capabilities. Welcome senses motions and detects faces or when Presence detects cars, animals or humans. Each detection is considered an event, and the cameras generate timelines of events (motions, face detected, car detected etc …). Users can choose what they think is relevant to record in their settings. For Presence, users can choose their settings where they want to record. They can select specific areas for alerts, called alert zones. Only the events within these alert zones will be recorded. Events are recorded and stored locally on the SD card that goes with every camera, depending on those above mentioned preferences.Following a FIFO model, as soon as the SD card is full, the oldest videos get deleted and disappear from users‘ timelines. For each event, the camera takes a snapshot and records a video. The snapshot is displayed in the timeline.
Accessing the Netatmo Data Servers:
Using Netatmo Smart Home API, you can retrieve users‘ home events and timelines, browse through past events, access videos and event snapshots. To retrieve data from Netatmo cameras, you have to use the Netatmo Data Servers. Authorization code grant is required for authentication. User should be able to remove his camera from the 3rd party application. For getting the authentication (access tokens) we are programming in PHP / Python and running the code on the local host (server).
Using PHP –
Steps-
Installing the XAMPP application for creating a server.
Creation of the Apache servers to execute the PHP codes.
Creation of the Netatmo app on the Netatmo development pages.
Modifying the code with the client id and client secret according to the web app created on netatmo pages.
Installation of Python 2.7x or 3x (Common errors with python installation – internal or external command not found, Solution inclusion of path in system path variables, Refer to image 1.2). Download latest version of Python from-https://www.python.org/downloads/
Install the necessary libraries using ‚pip install xxxxxx‘ command in command prompt (Flask, Request)
From the link above, modify the code with your client id and client secret.
Run the python code using the command prompt.
Code Snipets –
from flask import Flask, render_template, redirect
from flask import request as r
import requests

app = Flask(__name__)

@app.route('/')
def sign():
return "<form action='/signin' method='get'><button type='submit'>Sign in</button></form>"

#Authorization Code type authentication flow
@app.route('/signin', methods=['GET'])
def signin():
# Test if "code" is provided in get parameters (that would mean that user has already accepted the app and has been redirected here)
if r.args.get('code'):
code = r.args.get('code')
payload = {'grant_type': 'authorization_code',
'client_id': '[5b0c5adb923dfe4ece8babb2]',
'client_secret': '[rS0oKZmPmcQSxmcqeKEkcNDFVi3bk5fQI3yN49]',
'code': code,
'redirect_uri': 'http://localhost:5000/signin'}
try:
response = requests.post("https://api.netatmo.com/oauth2/token", data=payload)
response.raise_for_status()
access_token=response.json()["access_token"]
refresh_token=response.json()["refresh_token"]
scope=response.json()["scope"]
return "<p>Your access_token is:" + access_token + "</p>"

except requests.exceptions.HTTPError as error:
print(error.response.status_code, error.response.text)
# Test if "error" is provided in get parameters (that would mean that the user has refused the app)
elif r.args.get('error') == 'access_denied':
return "The user refused to give access to his Netatmo data"
# If "error" and "code" are not provided in get parameters: the user should be prompted to authorize your app
else:

payload = {'client_id':"[5ae4d16aac34a592b18c0707]",
'redirect_uri': "http://localhost:5000/signin",
'scope': '[read_camera]',
'state':'[SOME_ARBITRARY_BUT_UNIQUE_STRING]'}
try:
response = requests.post("https://api.netatmo.com/oauth2/authorize", params=payload)
response.raise_for_status()
return redirect(response.url, code=302)
except requests.exceptions.HTTPError as error:
print(error.response.status_code, error.response.text)

if __name__ == "__main__":
app.run()
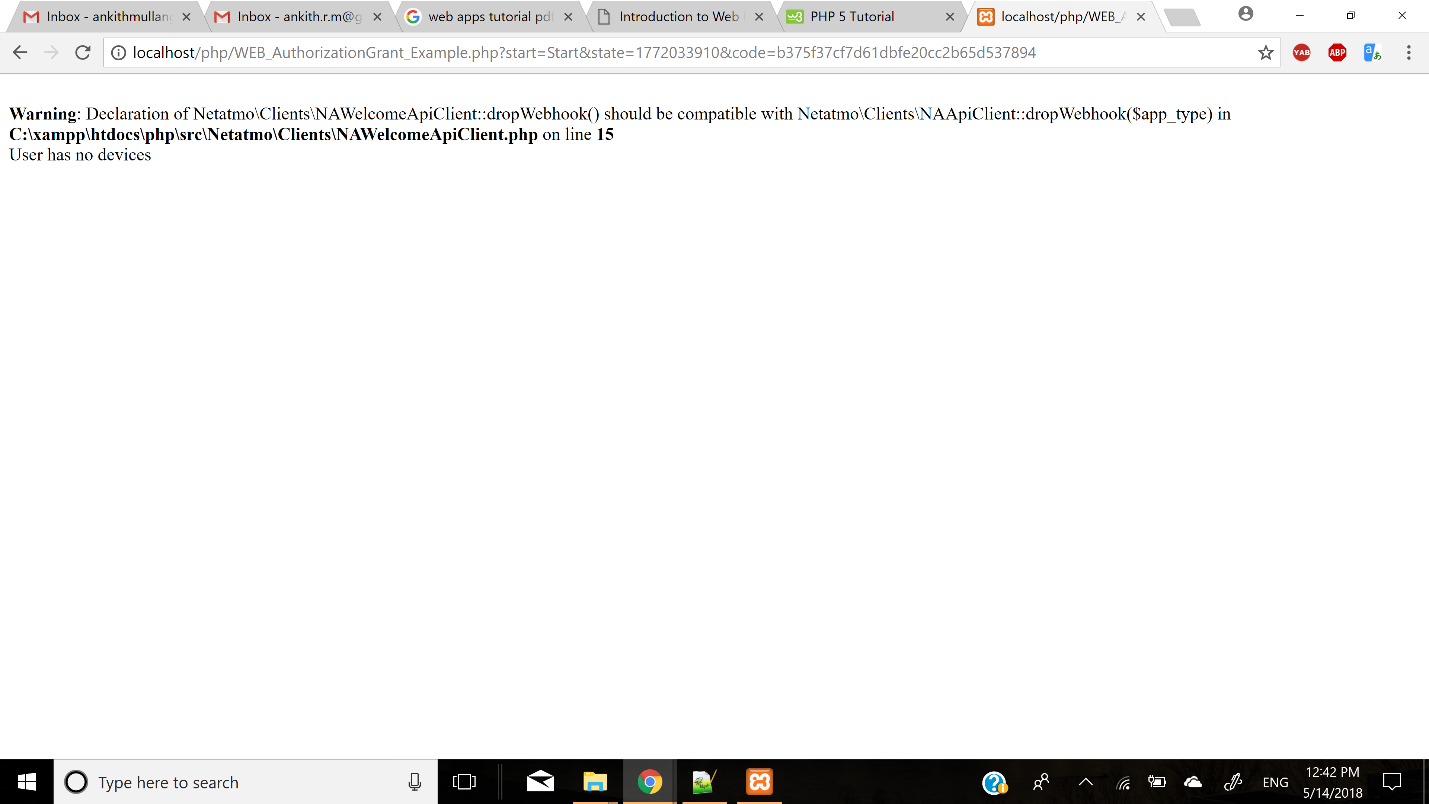
The following shows the Errors faced during the process
When you are doing the same thing, you are saying „You are entering the development servers, please use WSGI servers“.
Matplotlib ( Matplotlib is optional, but recommended since we use it in our tutorials. )
grade
In this case, we are using 32-bit binaries of Python packages. But if you want to use OpenCV for x64, 64-bit binaries of Python packages are to be installed. Problem is, there is no official 64-bit binaries of numpy. You have to build it on your own. For that, you have to use the same compiler to build Python. When you start Python IDLE, it shows the compiler details. You can get more information here . So your system must have the same Visual Studio version and build Numpy from source.
Another way to make Python packages ready for use Python distributions from third party like Anaconda , Enthought etc. It wants to be bigger in size, but wants to have everything you need. Everything in a single shell. So you can download 32-bit versions like that.
Make sure Python and Numpy are working fine.
Download OpenCV source. It can be from Sourceforge (for official release version) or from Github (for latest source).
Extract it to a folder, opencv and create a new folder build in it.
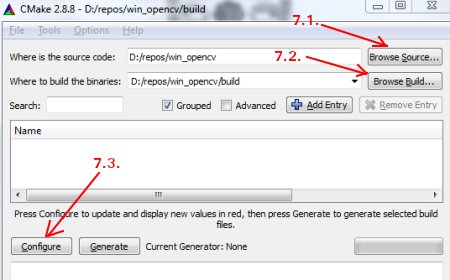
Open CMake-gui ( Start> All Programs> CMake-gui )
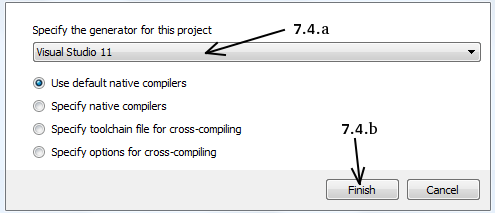
Fill the fields as follows (see the image below):
Click on Browse Source … and locate the opencv folder.
Click on Browse Build … and locate the build folder we created.
Click on Configure .
It wants to open a new window to select the compiler. Choose appropriate compiler (here, Visual Studio 11) and click Finish .
Wait until analysis is finished.
You want to see all the fields are marked in red. Click on the WITH field to expand it. It decides what extra features you need. So mark appropriate fields. See the below image:
Now click on BUILD field to expand it. First few fields configure the build method. See the below image:
Remaining fields specify what modules are to be built. Since GPU modules are not supported by OpenCV Python, you can completely avoid it to save time (But if you work with them, keep it there). See the image below:
Now click on ENABLE field to expand it. Make sure ENABLE_SOLUTION_FOLDERS is unchecked (Solution folders are not supported by Visual Studio Express edition). See the image below:
So make sure that’s in the PYTHON field, everything is filled. (Ignore PYTHON_DEBUG_LIBRARY). Lake image below:
Finally, click the Generate button.
Now go to our opencv / build folder. There you will find OpenCV.sln file. Open it with Visual Studio.
Check build mode as Release instead of Debug .
In the solution explorer, right-click on the solution (or ALL_BUILD ) and build it. It wants to take some time to finish.
Again, right-click on INSTALL and build it. Now OpenCV Python wants to be installed.
Open Python IDLE and enter ‚import cv2 as cv‘. If no error, it is installed correctly.