To start with Azure:
1) Create a microsoft account.
2) Create an azure account.
There is a student account for Azure (Azure for Students). You can create the account using the university email id.
The link -https: //azure.microsoft.com/en-us/free/students/
Basic tutorial to start with azure is:
1) Create to IoT Hub
- Log in to the Azure portal .
- Select Resource > Internet of Things (IoT) > IoT Hub .
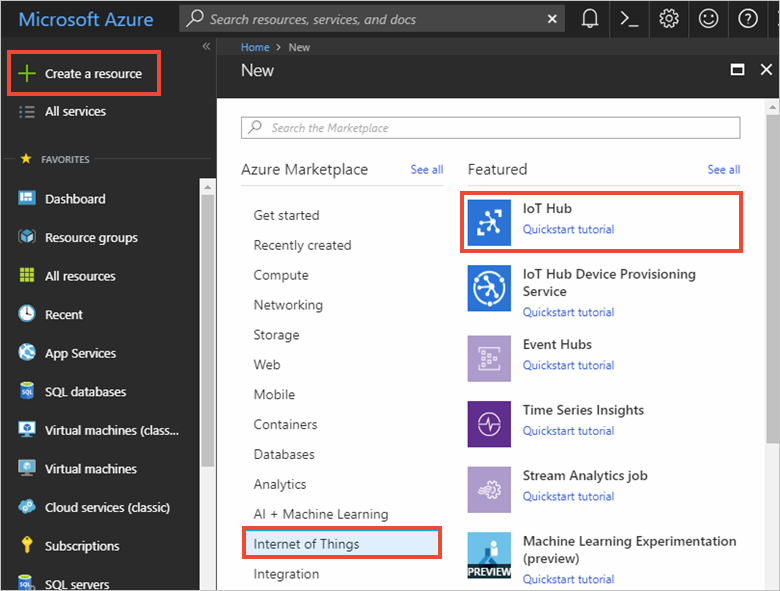
- In the IoT Hub section, enter the following information for your IoT Hub:
- Subscription : Select the subscription you want to use to create this IoT Hub.
- Resource Group : Create a resource group to host the IoT Hub, or use an existing one.
- Region : Select the nearest location.
- Name : Create a name for your IoT hub. If the entered name is available, a green check mark will be displayed.
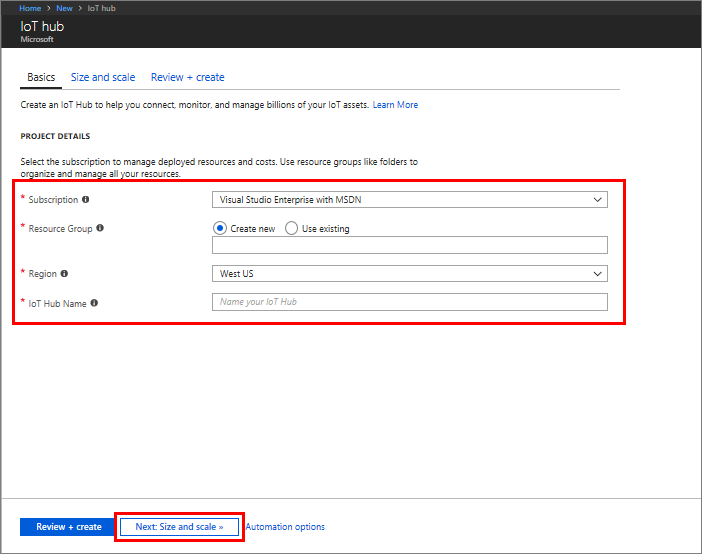
- Click Next: Size and scale to continue building your IoT hub.
- Select an option for tariff and scaling . Set the F1 – Free fare for this item if it is still available for your subscription.
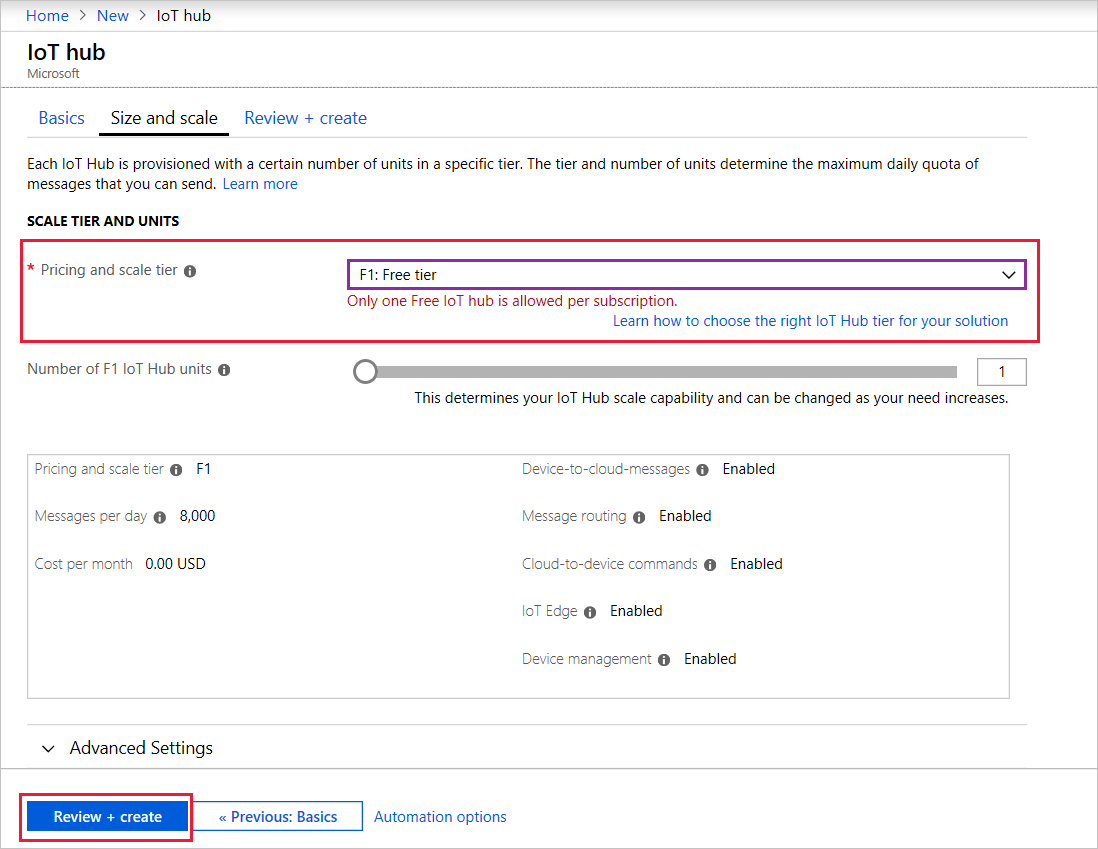
- Click Review + Create .
- Review the IoT Hub information and click Create . Creating the IoT Hub can take several minutes. You can monitor progress in the Notifications area.
Now that you have created an IoT hub, locate the important information that you use to connect devices and applications to your IoT hub.
In your IoT hub navigation menu, open Shared access policies. Select the iothubowner policy, and then copy the Connection string—primary key of your IoT hub.
Register a device in the IoT hub for your device
- In your IoT hub navigation menu, open IoT devices, then click Add to register a device in your IoT hub.
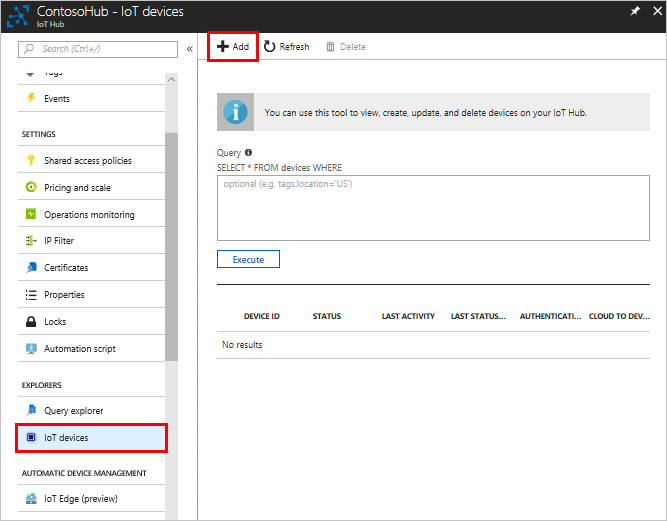
- Enter a Device ID for the new device. Device IDs are case sensitive.
Note:
The device ID may be visible in the logs collected for customer support and troubleshooting, so make sure to avoid any sensitive information while naming it.
3.Click Save.
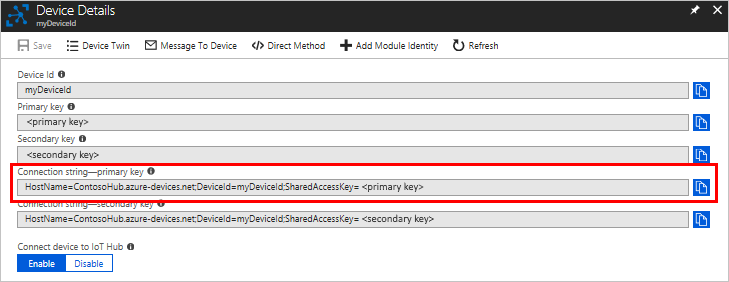
4.After the device is created, open the device from the list in the IoT devices pane.
5.Copy the Connection string—primary key to use later.
After creating a IoT device , you can start off with how cloud to device or device to cloud messages are sent and received .
Send cloud-to-device messages with IoT Hub
What we do here is –
- From your solution back end, send cloud-to-device messages to a single device through IoT Hub.
- Receive cloud-to-device messages on a device.
- From your solution back end, request delivery acknowledgement (feedback) for messages sent to a device from IoT Hub.
At the end , you run two Python console apps:
- SimulatedDevice.py, a modified version of the app created in Get started with IoT Hub, which connects to your IoT hub and receives cloud-to-device messages.
- SendCloudToDeviceMessage.py, which sends a cloud-to-device message to the simulated device app through IoT Hub, and then receives its delivery acknowledgement.
To complete this task, you need the following:
- Python 2.x or 3.x. Make sure to use the 32-bit or 64-bit installation as required by your setup. When prompted during the installation, make sure to add Python to your platform-specific environment variable. If you are using Python 2.x, you may need to install or upgrade pip, the Python package management system.
- If you are using Windows OS, then Visual C++ redistributable package to allow the use of native DLLs from Python.
- An active Azure account. (If you don’t have an account, you can create a free account in just a couple of minutes.)
Receive messages in the simulated device app
In this section, you create a Python console app to simulate the device and receive cloud-to-device messages from the IoT hub.
- Using a text editor, create a SimulatedDevice.py file.
- Add the following
importstatements and variables at the start of the SimulatedDevice.py file:import time
import sys
import iothub_client
from iothub_client import IoTHubClient, IoTHubClientError, IoTHubTransportProvider, IoTHubClientResult
from iothub_client import IoTHubMessage, IoTHubMessageDispositionResult, IoTHubErrorRECEIVE_CONTEXT = 0
WAIT_COUNT = 10
RECEIVED_COUNT = 0
RECEIVE_CALLBACKS = 0 - Add the following code to SimulatedDevice.py file. Replace the “{deviceConnectionString}” placeholder value with the device connection string for the device you created.
# choose AMQP or AMQP_WS as transport protocol
PROTOCOL = IoTHubTransportProvider.AMQP
CONNECTION_STRING = “{deviceConnectionString}”
4.Add the following function to print received messages to the console:
def receive_message_callback(message, counter):
global RECEIVE_CALLBACKS
message_buffer = message.get_bytearray()
size = len(message_buffer)
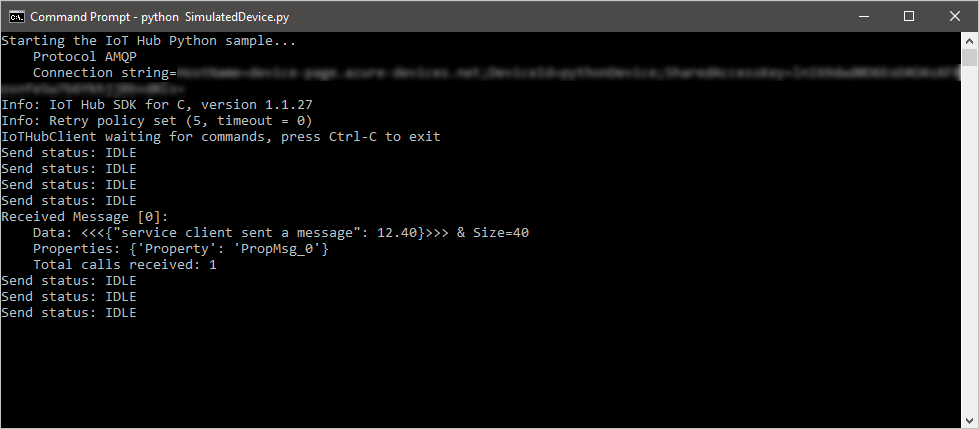
print ( “Received Message [%d]:” % counter )
print ( ” Data: <<<%s>>> & Size=%d” % (message_buffer[:size].decode(‘utf-8’), size) )
map_properties = message.properties()
key_value_pair = map_properties.get_internals()
print ( ” Properties: %s” % key_value_pair )
counter += 1
RECEIVE_CALLBACKS += 1
print ( ” Total calls received: %d” % RECEIVE_CALLBACKS )
return IoTHubMessageDispositionResult.ACCEPTED
def iothub_client_init():
client = IoTHubClient(CONNECTION_STRING, PROTOCOL)
client.set_message_callback(receive_message_callback, RECEIVE_CONTEXT)
return client
def print_last_message_time(client):
try:
last_message = client.get_last_message_receive_time()
print ( “Last Message: %s” % time.asctime(time.localtime(last_message)) )
print ( “Actual time : %s” % time.asctime() )
except IoTHubClientError as iothub_client_error:
if iothub_client_error.args[0].result == IoTHubClientResult.INDEFINITE_TIME:
print ( “No message received” )
else:
print ( iothub_client_error )
5.Add the following code to initialize the client and wait to recieve the cloud-to-device message:
def iothub_client_init():
client = IoTHubClient(CONNECTION_STRING, PROTOCOL)
client.set_message_callback(receive_message_callback, RECEIVE_CONTEXT)
return client
def iothub_client_sample_run():
try:
client = iothub_client_init()
while True:
print ( “IoTHubClient waiting for commands, press Ctrl-C to exit” )
status_counter = 0
while status_counter <= WAIT_COUNT:
status = client.get_send_status()
print ( “Send status: %s” % status )
time.sleep(10)
status_counter += 1
except IoTHubError as iothub_error:
print ( “Unexpected error %s from IoTHub” % iothub_error )
return
except KeyboardInterrupt:
print ( “IoTHubClient sample stopped” )
print_last_message_time(client)
6.Add the following main function:
if __name__ == ‘__main__’:
print ( “Starting the IoT Hub Python sample…” )
print ( ” Protocol %s” % PROTOCOL )
print ( ” Connection string=%s” % CONNECTION_STRING )
iothub_client_sample_run()
7.Save and close SimulatedDevice.py file.
Send a cloud-to-device message
In this section, you create a Python console app that sends cloud-to-device messages to the simulated device app. You need the device ID of the device you added in the Get started with IoT Hub tutorial. You also need the IoT Hub connection string for your hub that you can find in the Azure portal.
- Using a text editor, create a SendCloudToDeviceMessage.py file.
- Add the following
importstatements and variables at the start of the SendCloudToDeviceMessage.py file:import random
import sys
import iothub_service_client
from iothub_service_client import IoTHubMessaging, IoTHubMessage, IoTHubErrorOPEN_CONTEXT = 0
FEEDBACK_CONTEXT = 1
MESSAGE_COUNT = 1
AVG_WIND_SPEED = 10.0
MSG_TXT = “{\”service client sent a message\”: %.2f}” - Add the following code to SendCloudToDeviceMessage.py file. Replace the “{IoTHubConnectionString}” placeholder value with the IoT Hub connection string for the hub you created in the Get started with IoT Hubtutorial. Replace the “{deviceId}” placeholder with the device ID of the device you added in the Get started with IoT Hub tutorial:
CONNECTION_STRING = “{IoTHubConnectionString}”
DEVICE_ID = “{deviceId}”
4.Add the following function to print feedback messages to the console:
def open_complete_callback(context):
print ( ‘open_complete_callback called with context: {0}’.format(context) )
def send_complete_callback(context, messaging_result):
context = 0
print ( ‘send_complete_callback called with context : {0}’.format(context) )
print ( ‘messagingResult : {0}’.format(messaging_result) )
5.Add the following code to send a message to your device and handle the feedback message when the device acknowledges the cloud-to-device message:
def iothub_messaging_sample_run():
try:
iothub_messaging = IoTHubMessaging(CONNECTION_STRING)
iothub_messaging.open(open_complete_callback, OPEN_CONTEXT)
for i in range(0, MESSAGE_COUNT):
print ( ‘Sending message: {0}’.format(i) )
msg_txt_formatted = MSG_TXT % (AVG_WIND_SPEED + (random.random() * 4 + 2))
message = IoTHubMessage(bytearray(msg_txt_formatted, ‘utf8’))
# optional: assign ids
message.message_id = “message_%d” % i
message.correlation_id = “correlation_%d” % i
# optional: assign properties
prop_map = message.properties()
prop_text = “PropMsg_%d” % i
prop_map.add(“Property”, prop_text)
iothub_messaging.send_async(DEVICE_ID, message, send_complete_callback, i)
try:
# Try Python 2.xx first
raw_input(“Press Enter to continue…\n”)
except:
pass
# Use Python 3.xx in the case of exception
input(“Press Enter to continue…\n”)
iothub_messaging.close()
except IoTHubError as iothub_error:
print ( “Unexpected error {0}” % iothub_error )
return
except KeyboardInterrupt:
print ( “IoTHubMessaging sample stopped” )
6. Add the following main function:
if __name__ == ‘__main__’:
print ( “Starting the IoT Hub Service Client Messaging Python sample…” )
print ( ” Connection string = {0}”.format(CONNECTION_STRING) )
print ( ” Device ID = {0}”.format(DEVICE_ID) )
iothub_messaging_sample_run()
7.Save and close SendCloudToDeviceMessage.py file.
Run the applications
You are now ready to run the applications.
- Open a command prompt and install the Azure IoT Hub Device SDK for Python.
pip install azure-iothub-device-client
- At the command prompt, run the following command to listen for cloud-to-device messages:
python SimulatedDevice.py
3.Open a new command prompt and install the Azure IoT Hub Service SDK for Python.
pip install azure-iothub-service-client
4.At a prompt command, run the following command to send a cloud-to-device message and wait for the message feedback:
python SendCloudToDeviceMessage.py
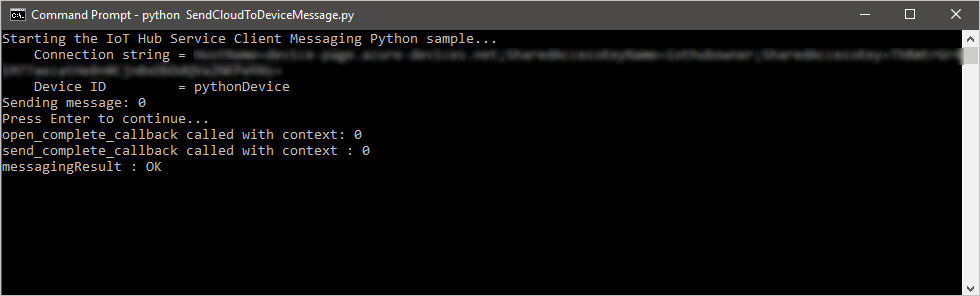
5.Note the message recieved by the device.