Message routes and custom endpoints for device-to-cloud-messages

IoT Hub enables you to route device-to-cloud messages to IoT Hub service-facing endpoints based on message properties. Routing rules give you the flexibility to send messages where you need to go without the need for additional services or custom code. Each routing rule you configure has the following properties:

Property description
Surname The unique name that identifies the rule.
source The origin of the data stream to be acted upon. For example, device telemetry.
Condition The query expression for the routing rule that is against the message’s headers and body and determines if it is a match for the endpoint. For more information about constructing a route condition, see the  Reference – query language for device twins and jobs .
Endpoint The name of the endpoint where IoT Hub sends messages that match the condition. Endpoints should be in the same region as the IoT hub, otherwise you may be charged for cross-region writes.

Endpoints and routing (to Azure Storage Container)

IoT hub has a default built-in endpoint. You can create custom endpoints to link to other services in your subscription to the hub. IoT Hub currently supports Azure storage containers, event hubs, service bus queues, and service bus topics as custom endpoints.

When you use routing and custom endpoints, messages are only delivered to the built-in endpoint. To deliver messages to the built-in endpoint as well as to a custom endpoint, add a route did sends messages to the  events  endpoint.

This means you have to create a route and a custom endpoint in the IoT Hub to send a message to a specific destination.

In this project we used Azure Storage Container as an endpoint. The purpose of this storage container is to send the message to the end user of the Raspberry Pi Container.

Azure Storage Container / Account

Azure storage account provides a unique namespace to store and access your Azure Storage data objects.

General-purpose storage accounts

A general-purpose storage account gives you access to Azure storage services such as tables, queues, files, blobs and azure virtual machines disks under a single account.

Blob Storage Accounts

A Blob storage account is a specialized storage account for storing your unstructured data as blobs (objects) in Azure Storage. Blob storage accounts are similar to existing general-purpose storage accounts and share all the great durability, availability, scalability, and performance features that you use today including 100% API consistency for block blobs and append blobs. For applications requiring only block or append blob storage, it is recommend using Blob storage accounts.

In this project it does not matter which type of storage account you use.

Creating a Storage Account

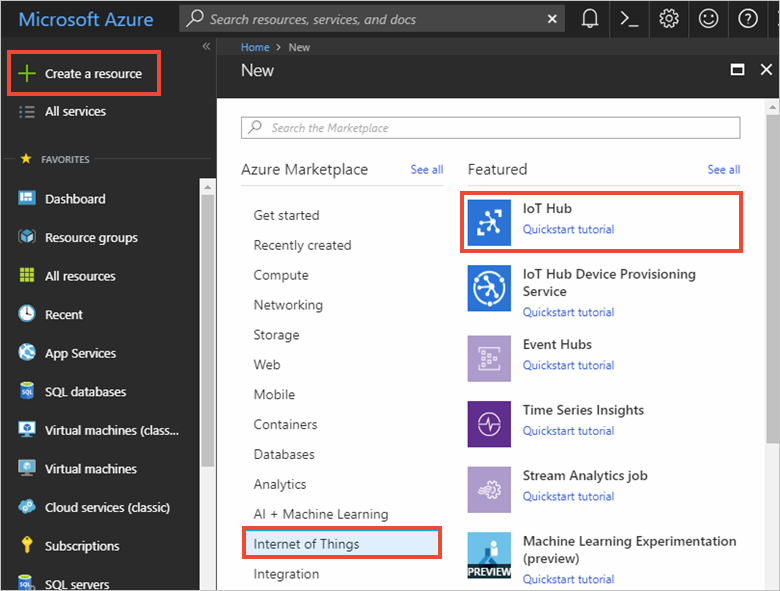
  1. In the Azure portal, expand the menu on the left side to open the menu of services, and choose More Services. Then, scroll down to Storage, and choose Storage accounts. On the Storage Accounts window that appears, choose Add.
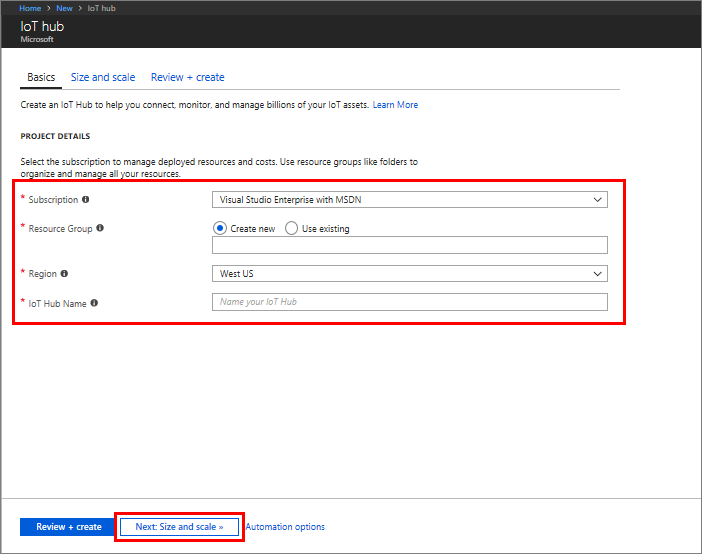
  2. Enter a name for your storage account.
  3. Specify the deployment model to be used: Resource Manager or ClassicResource Manager is the recommended deployment model.
  4. Select the type of storage account: General purpose or Blob storageGeneral purpose is the default.
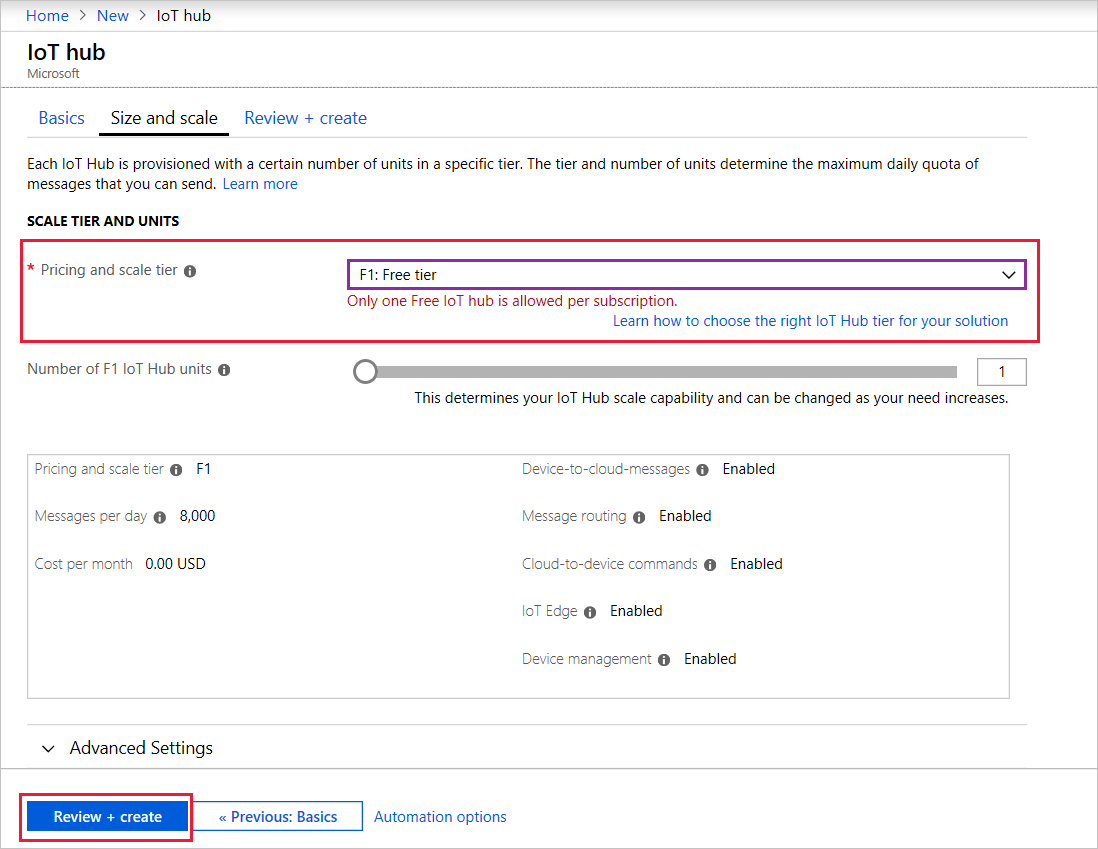
  5. Select the replication option for the storage account: LRSGRSRA-GRS, or ZRS. The default is RA-GRS. If RA-GRS does not work, try LRS. LRS worked in this project.
  6. Select the subscription in which you want to create the new storage account.
  7. Specify a new resource group or select an existing resource group.You should use your existing resource group.
  8. Select the geographic location for your storage account. Here you should use Europe-West/ West Europe.
  9. Click Create to create the storage account.

Set up message routing

You are going to route messages to different resources based on properties attached to the message by the simulated device. Messages that are not custom routed are sent to the default endpoint (messages/events). This means in this project it was necessary to create a custom endpoint for the storage container.

To create this route to the storage account it is necessary to define an endpoint, and then set up a route for that endpoint. This is done like this:

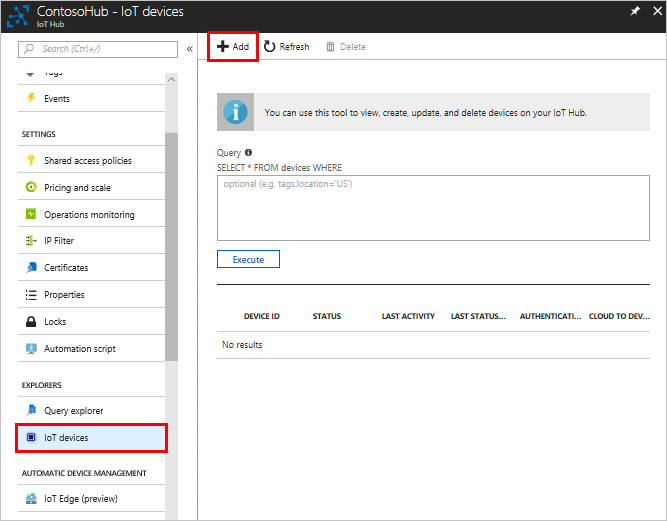
  • In the Azure portal, click Resource Groups, then select your resource group. This tutorial uses ContosoResources. Click the IoT hub under the list of resources. This tutorial uses ContosoTestHub. Click Endpoints. In the Endpointspane, click +Add. Enter the following information:
  • Name: Enter a name for the endpoint. This tutorial uses StorageContainer.
  • Endpoint Type: Select Azure Storage Container from the dropdown list.
  • Click Pick a container to see the list of storage accounts. Select your storage account. In the following example picture the name of the storage account is contosostorage. Next, select the container. This tutorial uses contosoresults. Click Select, which returns you to the Add endpoint pane

After these steps the endpoint is created and links to the storage account.

Now a route to this endpoint had to be created. To create a route to the following:

Click Routes on your IoT hub. You’re going to create a routing rule that routes messages to the storage container you just added as an endpoint. Click +Add at the top of the Routes pane. Fill in the fields on the screen.

Name: Enter a name for your routing rule. This tutorial uses StorageRule.

Data source: Select Device Messages (in this project these are the Raspberry Pi messages) from the dropdown list.

As Query string there are following possibilities:

value Result
level=“storage“ Write to Azure Storage.
level=“critical“ Write to a Service Bus queue. A Logic App can access a Service Bus queue.
default Display this data using Power BI.


This means in this case we have to choose “storage” as Query string to create a route to an storage account.

Click Save. When it finishes, it returns to the Routes pane, where you can see your new routing rule for storage.

The route is now finished and whenever a message is sent from the chosen device the message will be sent to the storage account and is stored there. On the picture above you can see the blob file name format in which the blob will be saved and how it will be named.

The sent files can be found in your Microsoft Azure. Expand the menu on the left and click on Storage Accounts . Select your storage account and click on blobs on the now opened main page. A new page will open with your created storage container. Click on your container and you will find a directory in the form of the blob file name format. There are all the files saved and you can download them to see the content. Alternatively you can download the Microsoft Azure Storage Explorer and open the files with this tool.


Send cloud-to-device messages (C2D) with IoT Hub (Python)

With Azure IoT It is possible to fully secure and secure bi-directional communications between millions of devices and a solution back end.

Microsoft is offering an example to test the cloud to device messaging. If you need to have this example you need to have python 2.x or 3.x installed on the Raspberry Pi. So you need the Visual C ++ redistribution package:

https://www.microsoft.com/en-us/download/confirmation.aspx?id=48145

and have to install the Azure IoT Hub Device SDK for Python and the Azure IoT Hub Service SDK for Python:

Now you can create a Python console app to receive and receive cloud-to-device messages from the IoT hub.

  • Using a text editor, create a SimulatedDevice.py  file.
  • Add the following import statements and variables at the start of the
  • SimulatedDevice. py  file:
import time 
import sys 
import iothub_client 
from iothub_client import IoTHubClient, IoTHubClientError, IoTHubTransportProvider, IoTHubClientResult 
from iothub_client import IoTHubMessage, IoTHubMessageDispositionResult, IoTHubError 

RECEIVE_CONTEXT = 0 
WAIT_COUNT = 10 
RECEIVED_COUNT = 0 
RECEIVE_CALLBACKS = 0
  • Add the following code to SimulatedDevice . py file. Replace the „{deviceConnectionString}“ placeholder value with the device connection
# choose AMQP or AMQP_WS as the transport protocol 
PROTOCOL = IoTHubTransportProvider.AMQP 
CONNECTION_STRING = "{deviceConnectionString}"
  • Add the following function to print received messages to the console:
def receive_message_callback(message, counter):
    global RECEIVE_CALLBACKS
    message_buffer = message.get_bytearray()
    size = len(message_buffer)
    print ( "Received Message [%d]:" % counter )
    print ( "    Data: <<<%s>>> & Size=%d" % (message_buffer[:size].decode('utf-8'), size) )
    map_properties = message.properties()
    key_value_pair = map_properties.get_internals()
    print ( "    Properties: %s" % key_value_pair )
    counter += 1
    RECEIVE_CALLBACKS += 1
    print ( "    Total calls received: %d" % RECEIVE_CALLBACKS )
    return IoTHubMessageDispositionResult.ACCEPTED

def iothub_client_init():
    client = IoTHubClient(CONNECTION_STRING, PROTOCOL)
    client.set_message_callback(receive_message_callback, RECEIVE_CONTEXT)
    return client


def print_last_message_time(client):
    try:
        last_message = client.get_last_message_receive_time()
        print ( "Last Message: %s" % time.asctime(time.localtime(last_message)) )
        print ( "Actual time : %s" % time.asctime() )
    except IoTHubClientError as iothub_client_error:
        if iothub_client_error.args[0].result == IoTHubClientResult.INDEFINITE_TIME:
            print ( "No message received" )
        else:
            print ( iothub_client_error )
  • Add the following code to initialize the client and wait to recieve the cloud-to-device message:
def iothub_client_init():
    client = IoTHubClient(CONNECTION_STRING, PROTOCOL)
    client.set_message_callback(receive_message_callback, RECEIVE_CONTEXT)
    return client

def iothub_client_sample_run():
    try:
        client = iothub_client_init()
        while True:
            print ( "IoTHubClient waiting for commands, press Ctrl-C to exit" )
            status_counter = 0
            while status_counter <= WAIT_COUNT:
                status = client.get_send_status()
                print ( "Send status: %s" % status )
                time.sleep(10)
                status_counter += 1

    except IoTHubError as iothub_error:
        print ( "Unexpected error %s from IoTHub" % iothub_error )
        return

    except KeyboardInterrupt:
        print ( "IoTHubClient sample stopped" )

    print_last_message_time(client)
  • Add the following main function:
if __name__ == '__main__':
    print ( "Starting the IoT Hub Python sample..." )
    print ( "    Protocol %s" % PROTOCOL )
    print ( "    Connection string=%s" % CONNECTION_STRING )

    iothub_client_sample_run()
  • Save and close SimulatedDevice.pyfile.

This SimulatedDevice.py file connects to your IoT hub and receives cloud-to-device messages. This means if you run this file on your Raspberry Pi it will detect when a message is send from the IoT Hub to your Raspberry Pi.

Now you create a Python console app that sends cloud-to-device messages to the simulated device app.  Microsoft also has an example for this case:

  • Using a text editor, create a SendCloudToDeviceMessage.pyfile.
  • Add the following importstatements and variables at the start of the SendCloudToDeviceMessage.py file:
import random
import sys
import iothub_service_client
from iothub_service_client import IoTHubMessaging, IoTHubMessage, IoTHubError


OPEN_CONTEXT = 0
FEEDBACK_CONTEXT = 1
MESSAGE_COUNT = 1
AVG_WIND_SPEED = 10.0
MSG_TXT = "{\"service client sent a message\": %.2f}"
  • Add the following code to pyfile. Replace the „{IoTHubConnectionString}“ placeholder value with the IoT Hub connection string for the hub you created and replace the „{deviceId}“ placeholder with the device ID of the device you added in the previous steps.
CONNECTION_STRING = "{IoTHubConnectionString}"
DEVICE_ID = "{deviceId}"
  • Add the following function to print feedback messages to the console:
def open_complete_callback(context):
    print ( 'open_complete_callback called with context: {0}'.format(context) )

def send_complete_callback(context, messaging_result):
    context = 0
    print ( 'send_complete_callback called with context : {0}'.format(context) )
    print ( 'messagingResult : {0}'.format(messaging_result) )
  • Add the following code to send a message to your device and handle the feedback message when the device acknowledges the cloud-to-device message:
def iothub_messaging_sample_run():
    try:

        iothub_messaging = IoTHubMessaging(CONNECTION_STRING)
        iothub_messaging.open(open_complete_callback, OPEN_CONTEXT)

        for i in range(0, MESSAGE_COUNT):
            print ( 'Sending message: {0}'.format(i) )
            msg_txt_formatted = MSG_TXT % (AVG_WIND_SPEED + (random.random() * 4 + 2))
            message = IoTHubMessage(bytearray(msg_txt_formatted, 'utf8'))

            # optional: assign ids
            message.message_id = "message_%d" % i
            message.correlation_id = "correlation_%d" % i
            # optional: assign properties
            prop_map = message.properties()
            prop_text = "PropMsg_%d" % i
            prop_map.add("Property", prop_text)
            iothub_messaging.send_async(DEVICE_ID, message, send_complete_callback, i)

        try:
            # Try Python 2.xx first
            raw_input("Press Enter to continue...\n")

        except:
            pass
            # Use Python 3.xx in the case of exception
            input("Press Enter to continue...\n")

        iothub_messaging.close()

    except IoTHubError as iothub_error:
        print ( "Unexpected error {0}" % iothub_error )
        return
    except KeyboardInterrupt:
        print ( "IoTHubMessaging sample stopped" )

  • Add the following main function:
if __name__ == '__main__':
    print ( "Starting the IoT Hub Service Client Messaging Python sample..." )
    print ( "    Connection string = {0}".format(CONNECTION_STRING) )
    print ( "    Device ID         = {0}".format(DEVICE_ID) )
    iothub_messaging_sample_run()
  • Now you have to run the applications on your Raspberry Pi. To do this you have to open a new command prompt/terminal and run the following command to listen for cloud-to-device messages:
python SimulatedDevice.py
  • After that open a new command prompt and run the following command to send a cloud-to-device message and wait for the message feedback:
python SendCloudToDeviceMessage.py
  • But the moment you start the SendCloudToDeviceMessage.py app you can see a change in the prompt command promptly where you started the SimulatedDevice.py app.

The command prompt could look like this:

Important for message sending: Service and device client SDK

You can leverage one’s Azure IoT service client SDKs to build the IoT hub and interact with devices from the cloud. The service SDK is needed to:

  • Manage the device identity registry (CRUD operations for devices).
  • Send messages to devices (C2D messages)
  • interact with Device Twins and Invoke Device Direct Methods

You need the device client SDK to:

  • Send event data to Azure IoT Hub
  • Recieve messages from Azure IoT Hub
  • Communicate with Azure IoT Hub via AMQP, MQTT or HTTP protocols
  • Synchronize to Azure IoT Hub Device Twin or Module Twin with Azure IoT Hub from a device or module
  • Implement Azure IoT Hub Direct Device / Modules Methods on devices / modules
  • Implement Azure IoT Device / Module Management features on devices / modules
  • Implement Azure IoT Edge and custom modules connecting to Edge Hub


To install these two SDKs you have to open the terminal on the Pi and use the following commands:

pip install azure-iothub-service-client
pip install azure-iothub-device-client

If pip is not already installed use this command to install it:

For python3:

sudo apt-get install python3-pip

For python2:

sudo apt-get install python-pip


But the installation should probably be done like this:

Build the Azure IoT Hub SDKs for Python on Linux

Installs needed to compile the SDKs for Python from souce code

Because the Azure IoT SDKs for Python are wrappers on top of the SDKs for C, you will need to compile the C libraries if you want or need to generate the Python libraries from source code. You will notice that the C SDKs are brought in as submodules to the current repository. In order to setup your development environment to build the C binaries, you need to follow the instructions here:

  1. Clone the Azure IoT Python SDK Repository
    git clone --recursive https://github.com/Azure/azure-iot-sdk-python.git 
    
  2. For Ubuntu, you can use apt-get to install the right packages:
    sudo apt-get update
    sudo apt-get install -y git cmake build-essential curl libcurl4-openssl-dev libssl-dev uuid-dev
    
  3. Verify that CMake is at least version 2.8.12:
    cmake --version
    

    For information about how to upgrade your version of CMake to 3.x on Ubuntu 14.04, read How to install CMake 3.2 on Ubuntu 14.04?.

  4. Verify that gcc is at least version 4.4.7:
    gcc --version
    

    For information about how to upgrade your version of gcc on Ubuntu 14.04, read How do I use the latest GCC 4.9 on Ubuntu 14.04?.

Compile the Python modules

The Python iothub_client and iothub_service_client modules support python versions 2.7.x, 3.4.x, 3.5.x or 3.6.x. Know the appropriate version you would like to build the library with for the following instructions.

  1. Clone the Azure IoT Python SDK Repository
    git clone --recursive https://github.com/Azure/azure-iot-sdk-python.git 
    
  2. Ensure that the desired Python version (2.7.x, 3.4.x, 3.5.x or 3.6.x) is installed and active. Run python --version or python3 --version at the command line to check the version.
  3. Open a shell and navigate to the folder build_all/linux in your local copy of the repository.
  4. Run the ./setup.sh script to install the prerequisite packages and the dependent libraries.
    • Setup will default to python 2.7
    • To setup dependencies for python version greater than 3, run ./setup.sh --python-version X.Y where „X.Y“ is the python version (e.g. 3.4, 3.5 or 3.6)
  5. Run the ./build.sh script.
    • Build will default to python 2.7
    • To build with python version greater than 3, run ./build.sh --build-python X.X where „X.Y“ is the python version (e.g. 3.4, 3.5 or 3.6)
  6. After a successful build, the  iothub_client.so Python extension module is copied to the  device / samples  and  service / samples  folders. Visit these folders for instructions on how to run the samples.

Introduction to Microsoft Azure and its Application

Microsoft Azure (formerly Windows Azure) is a cloud computing service created by Microsoft for building, testing, deploying, and managing applications and services through a global network of Microsoft-managed data centers. It provides software as a service (SaaS), platform as a service (PaaS) and infrastructure as a service (IaaS) and supports many different programming languages, tools and frameworks, including both Microsoft-specific and third-party software and systems.

Services –
Microsoft lists over 600 Azure services, of which some are covered below:

Compute

  • Virtual machines, infrastructure as a service (IaaS) allowing users to launch general-purpose Microsoft Windows and Linux virtual machines, as well as preconfigured machines images for popular software packages.
  • App services, platform as a service (PaaS) environment.
  • Web Sites, high density hosting sites that allow developers to build sites using ASP.NET, PHP, Node.js, or Python and can be deployed using FTP, Git, Mercurial, Team Foundation Server or uploaded through the user portal. This feature was announced in preview form at the Microsoft Azure event. [6] Customers can create websites in PHP, ASP.NET, Node.js, or Python, or select from several open source applications from a gallery to deploy. This aspect is one of the services offered by PaaS for the Microsoft Azure Platform. It’s renamed to Web Apps in April 2015.
  • WebJobs, applications that can be deployed to the App Service environment to implement the background processing that can be on schedule, on demand, or run continuously. The Blob, Table and Queue Services can be used to communicate between WebApps and WebJobs and to provide state.

Mobile services

  • Mobile engagement collects real-time analytics that highlight users‘ behavior. It also provides push notifications to mobile devices.
  • HockeyApp can be used to develop, distribute, and beta-test mobile apps.

Storage services

  • Storage Services provides REST and SDK APIs for storing and accessing data on the cloud.
  • Table Service can be read by partition key and primary key. It’s a NoSQL non-relational database.
  • Blob Service provides programs to store unstructured text and binary data as well as HTTP (S) path. Blob service also provides security mechanisms to control access to data.
  • Queue Service lets programs communicate asynchronously by message using queues.
  • File Service allows the storage and access of data on the cloud using the REST APIs or the SMB protocol.

Data management

  • Azure Search provides text search and subset of OData’s structured filters using REST or SDK APIs.
  • Cosmos DB is a NoSQL database service that implements a SQL statement on JSON documents.
  • Redis Cache is a managed implementation of Redis.
  • StorSimple manages storage tasks between on-premises devices and cloud storage.
  • SQL Database, formerly known as SQL Azure Database, works to create, scale and extend applications into the cloud using Microsoft SQL Server technology. It also integrates with Active Directory and Microsoft System Center and Hadoop.
  • SQL Data Warehouse is a data warehousing service designed to handle computational and data intensive queries on datasets exceeding 1TB.
  • Azure Data Factory, is a data integration service that allows creation of data-driven workflows in the cloud for orchestrating and automating data movement and data transformation.
  • Azure Data Lake is a scalable data storage and analytic service for big-data analytics workloads that require developers to run massively parallel queries.
  • Azure HDInsight is a big data relevant service, that deploys Hortonworks Hadoop on Microsoft Azure, and supports the creation of Hadoop clusters using Linux with Ubuntu.
  • Azure Stream Analytics is a serverless scalable event processing engine that enables users to develop and run real-time analytics on multiple streams of data from sources such as devices, sensors, web sites, social media, and other applications.

Messaging
The Microsoft Azure Service Bus allows applications running on Azure premises or off premises devices to communicate with Azure. This helps to build scalable and reliable applications in a service-oriented architecture (SOA). The Azure service bus supports four different types of communication mechanisms:

  • Event Hubs, which provide event and telemetry ingress to the cloud at massive scale, with low latency and high reliability. For example an event hub can be used to track data from cell phones such as a GPS location coordinate in real time.
  • Queues, which allow one-directional communication. A sender application would send the message to the service bus queue, and a receiver would read from the queue. Though there can be multiple readers for the queue only one would process a single message.
  • Topics, which provide one-directional communication using a subscriber pattern. It is similar to a queue, however each subscriber will receive a copy of the message sent to a Topic. Optionally the subscriber can filter out messages based on specific criteria defined by the subscriber.
  • Relays, which provide bi-directional communication. Unlike queues and topics, a relay doesn’t store in-flight messages in its own memory. Instead, it just passes them on to the destination application.

Media services –

A Paas offering that can be used for encoding, content protection, streaming, or analytics.

CDN –

A global content delivery network (CDN) for audio, video, applications, images, and other static files. It can be used to cache static assets of websites geographically closer to users to increase performance. The network can be managed by a REST based HTTP API.

Developer – Application Insights and Visual Studio Team Services

Management –

Azure Automation, provides a way for users to automate the manual, long-running, error-prone, and frequently repeated tasks that are commonly performed in a cloud and enterprise environment. It saves time and increases the reliability of regular administrative tasks and even schedules them to be automatically performed at regular intervals. You can automate processes using runbooks or automate configuration management using Desired State Configuration.

Machine learning

Microsoft Azure Machine Learning (Azure ML) service is part of Cortana Intelligence Suite that enables predictive analytics and interaction with data using natural language and speech through Cortana. Cognitive Services (formerly Project Oxford) are a set of APIs, SDKs and services available to developers to make their applications more intelligent, engaging and discoverable.

IoT

Microsoft announced the launch of the Azure Sphere, an end-to-end IoT product that uses microcontroller-based devices and Linux.
Microsoft launches Azure IoT Edge, used to run Azure services and artificial intelligence on IoT devices.


Azure Components used in Project

Azure components –

Picture1.png

Azure Components used !!

  • IoT Hub – Internet of Things connector to the cloud
  • Logic App – Workflow and Integration
  • Functions – Serverless Computing
  • Azure Blob Storage – Storage of data

Picture2.png

IoT Hub – Connect, monitor, and manage billions of  IoT  assets – Use  Azure  IoT Hub  to connect, monitor, and manage Internet of Things ( IoT ) applications. IoT  Hub is an open and flexible cloud platform offering open source SDKs and multiple protocols.

Azure functions are an event driven, compute-on-demand experience that extends the existing Azure application platform.

Azure Blob Storage – to store arbitrarily large amounts of unstructured data and serve them to users over HTTP and HTTPS. This data can be accessed anywhere in the world and can include audio, video and text. Blobs are grouped into „containers“ that are tied to user accounts. Blobs can be manipulated with .NET code

Logic App –  Azure Logic Apps  Simplifies how you build automated workflows scalable did integrate  apps  and data across cloud services and on-premises systems. Learn how to create, design, and deploy  logic  apps did automate business processes with our quickstarts, tutorials, templates, and APIs.

To start with Azure and Device to Cloud Communication

To start with Azure:

1) Create a microsoft account.

2) Create an azure account.

There is a student account for Azure (Azure for Students). You can create the account using the university email id.

The link -https: //azure.microsoft.com/en-us/free/students/

Basic tutorial to start with azure is:

1) Create to IoT Hub

  • Log in to the  Azure portal  .
  • Select  Resource  >  Internet of Things (IoT)  >  IoT Hub  .

Screenshot of the navigation to IoT Hub in the Azure portal

  • In the  IoT Hub  section,  enter  the following information for your IoT Hub:
    • Subscription  : Select the subscription you want to use to create this IoT Hub.
    • Resource Group  : Create a resource group to host the IoT Hub, or use an existing one.
    • Region  : Select the nearest location.
    • Name  : Create a name for your IoT hub. If the entered name is available, a green check mark will be displayed.

create-iot-hub2.png

  • Click Next: Size and scale to continue building your IoT hub.
  • Select an option for tariff and scaling . Set the F1 – Free fare for this item if it is still available for your subscription.

Window for IoT hub size and scaling

  • Click Review + Create .
  • Review the IoT Hub information and click Create . Creating the IoT Hub can take several minutes. You can monitor progress in the Notifications area.

Now that you have created an IoT hub, locate the important information that you use to connect devices and applications to your IoT hub.

In your IoT hub navigation menu, open Shared access policies. Select the iothubowner policy, and then copy the Connection string—primary key of your IoT hub.

Register a device in the IoT hub for your device

  1. In your IoT hub navigation menu, open IoT devices, then click Add to register a device in your IoT hub.Add a device to the IoT Devices of your IoT hub
  2. Enter a Device ID for the new device. Device IDs are case sensitive.

Note:

The device ID may be visible in the logs collected for customer support and troubleshooting, so make sure to avoid any sensitive information while naming it.

3.Click Save.

4.After the device is created, open the device from the list in the IoT devices pane.

5.Copy the Connection string—primary key to use later.

Get the device connection string

After creating a IoT device , you can start off with how cloud to device or device to cloud messages are sent and received .

Send cloud-to-device messages with IoT Hub

What we do here is –

  • From your solution back end, send cloud-to-device messages to a single device through IoT Hub.
  • Receive cloud-to-device messages on a device.
  • From your solution back end, request delivery acknowledgement (feedback) for messages sent to a device from IoT Hub.

At the end , you run two Python console apps:

  • SimulatedDevice.py, a modified version of the app created in Get started with IoT Hub, which connects to your IoT hub and receives cloud-to-device messages.
  • SendCloudToDeviceMessage.py, which sends a cloud-to-device message to the simulated device app through IoT Hub, and then receives its delivery acknowledgement.

To complete this task, you need the following:

Receive messages in the simulated device app

In this section, you create a Python console app to simulate the device and receive cloud-to-device messages from the IoT hub.

  1. Using a text editor, create a SimulatedDevice.py file.
  2. Add the following import statements and variables at the start of the SimulatedDevice.py file:import time
    import sys
    import iothub_client
    from iothub_client import IoTHubClient, IoTHubClientError, IoTHubTransportProvider, IoTHubClientResult
    from iothub_client import IoTHubMessage, IoTHubMessageDispositionResult, IoTHubErrorRECEIVE_CONTEXT = 0
    WAIT_COUNT = 10
    RECEIVED_COUNT = 0
    RECEIVE_CALLBACKS = 0
  3. Add the following code to SimulatedDevice.py file. Replace the “{deviceConnectionString}” placeholder value with the device connection string for the device you created.

# choose AMQP or AMQP_WS as transport protocol
PROTOCOL = IoTHubTransportProvider.AMQP
CONNECTION_STRING = “{deviceConnectionString}”

4.Add the following function to print received messages to the console:

def receive_message_callback(message, counter):
global RECEIVE_CALLBACKS
message_buffer = message.get_bytearray()
size = len(message_buffer)
print ( “Received Message [%d]:” % counter )
print ( ” Data: <<<%s>>> & Size=%d” % (message_buffer[:size].decode(‘utf-8’), size) )
map_properties = message.properties()
key_value_pair = map_properties.get_internals()
print ( ” Properties: %s” % key_value_pair )
counter += 1
RECEIVE_CALLBACKS += 1
print ( ” Total calls received: %d” % RECEIVE_CALLBACKS )
return IoTHubMessageDispositionResult.ACCEPTED

def iothub_client_init():
client = IoTHubClient(CONNECTION_STRING, PROTOCOL)

client.set_message_callback(receive_message_callback, RECEIVE_CONTEXT)

return client

def print_last_message_time(client):
try:
last_message = client.get_last_message_receive_time()
print ( “Last Message: %s” % time.asctime(time.localtime(last_message)) )
print ( “Actual time : %s” % time.asctime() )
except IoTHubClientError as iothub_client_error:
if iothub_client_error.args[0].result == IoTHubClientResult.INDEFINITE_TIME:
print ( “No message received” )
else:
print ( iothub_client_error )

5.Add the following code to initialize the client and wait to recieve the cloud-to-device message:

def iothub_client_init():
client = IoTHubClient(CONNECTION_STRING, PROTOCOL)

client.set_message_callback(receive_message_callback, RECEIVE_CONTEXT)

return client

def iothub_client_sample_run():
try:
client = iothub_client_init()

while True:
print ( “IoTHubClient waiting for commands, press Ctrl-C to exit” )

status_counter = 0
while status_counter <= WAIT_COUNT:
status = client.get_send_status()
print ( “Send status: %s” % status )
time.sleep(10)
status_counter += 1

except IoTHubError as iothub_error:
print ( “Unexpected error %s from IoTHub” % iothub_error )
return
except KeyboardInterrupt:
print ( “IoTHubClient sample stopped” )

print_last_message_time(client)

6.Add the following main function:

if __name__ == ‘__main__’:
print ( “Starting the IoT Hub Python sample…” )
print ( ” Protocol %s” % PROTOCOL )
print ( ” Connection string=%s” % CONNECTION_STRING )

iothub_client_sample_run()

7.Save and close SimulatedDevice.py file.

Send a cloud-to-device message

In this section, you create a Python console app that sends cloud-to-device messages to the simulated device app. You need the device ID of the device you added in the Get started with IoT Hub tutorial. You also need the IoT Hub connection string for your hub that you can find in the Azure portal.

  1. Using a text editor, create a SendCloudToDeviceMessage.py file.
  2. Add the following import statements and variables at the start of the SendCloudToDeviceMessage.py file:import random
    import sys
    import iothub_service_client
    from iothub_service_client import IoTHubMessaging, IoTHubMessage, IoTHubErrorOPEN_CONTEXT = 0
    FEEDBACK_CONTEXT = 1
    MESSAGE_COUNT = 1
    AVG_WIND_SPEED = 10.0
    MSG_TXT = “{\”service client sent a message\”: %.2f}”
  3. Add the following code to SendCloudToDeviceMessage.py file. Replace the “{IoTHubConnectionString}” placeholder value with the IoT Hub connection string for the hub you created in the Get started with IoT Hubtutorial. Replace the “{deviceId}” placeholder with the device ID of the device you added in the Get started with IoT Hub tutorial:

CONNECTION_STRING = “{IoTHubConnectionString}”
DEVICE_ID = “{deviceId}”

4.Add the following function to print feedback messages to the console:

def open_complete_callback(context):
print ( ‘open_complete_callback called with context: {0}’.format(context) )

def send_complete_callback(context, messaging_result):
context = 0
print ( ‘send_complete_callback called with context : {0}’.format(context) )
print ( ‘messagingResult : {0}’.format(messaging_result) )

5.Add the following code to send a message to your device and handle the feedback message when the device acknowledges the cloud-to-device message:

def iothub_messaging_sample_run():
try:
iothub_messaging = IoTHubMessaging(CONNECTION_STRING)

iothub_messaging.open(open_complete_callback, OPEN_CONTEXT)

for i in range(0, MESSAGE_COUNT):
print ( ‘Sending message: {0}’.format(i) )
msg_txt_formatted = MSG_TXT % (AVG_WIND_SPEED + (random.random() * 4 + 2))
message = IoTHubMessage(bytearray(msg_txt_formatted, ‘utf8’))

# optional: assign ids
message.message_id = “message_%d” % i
message.correlation_id = “correlation_%d” % i
# optional: assign properties
prop_map = message.properties()
prop_text = “PropMsg_%d” % i
prop_map.add(“Property”, prop_text)

iothub_messaging.send_async(DEVICE_ID, message, send_complete_callback, i)

try:
# Try Python 2.xx first
raw_input(“Press Enter to continue…\n”)
except:
pass
# Use Python 3.xx in the case of exception
input(“Press Enter to continue…\n”)

iothub_messaging.close()

except IoTHubError as iothub_error:
print ( “Unexpected error {0}” % iothub_error )
return
except KeyboardInterrupt:
print ( “IoTHubMessaging sample stopped” )

6. Add the following main function:

if __name__ == ‘__main__’:
print ( “Starting the IoT Hub Service Client Messaging Python sample…” )
print ( ” Connection string = {0}”.format(CONNECTION_STRING) )
print ( ” Device ID = {0}”.format(DEVICE_ID) )

iothub_messaging_sample_run()

7.Save and close SendCloudToDeviceMessage.py file.

Run the applications

You are now ready to run the applications.

  1. Open a command prompt and install the Azure IoT Hub Device SDK for Python.
     pip install azure-iothub-device-client
  2. At the command prompt, run the following command to listen for cloud-to-device messages:

python SimulatedDevice.pyRun the simulated device app

3.Open a new command prompt and install the Azure IoT Hub Service SDK for Python.

pip install azure-iothub-service-client

4.At a prompt command, run the following command to send a cloud-to-device message and wait for the message feedback:

python SendCloudToDeviceMessage.py

Run the app to send the cloud-to-device command

5.Note the message recieved by the device.

Message received


Logic Functions

An introduction to Azure Functions

Azure Functions is a solution for easily running small pieces of code, or „functions,“ in the cloud. You can write just the code you need for the problem at hand, without worrying about a whole application or the infrastructure to run it. C #, F #, Node.js, Java, or PHP. Functions can make more productive, and you can use your language of choice. Pay only for the time your code runs and trust Azure to scale as needed. Azure Functions lets you develop serverless applications on Microsoft Azure.

This topic provides a high-level overview of Azure Functions. If you want to jump right into and start with functions, start with your first Azure Function. If you are looking for more technical information about Functions, see the developer reference.

features

Here are some key features of Functions:

  • Choice of language  – Write functions using your choice of C #, F #, or Javascript. See Supported languages ​​for other options.
  • Pay-per-use pricing model  – Pay only for the time spent running your code. See the Consumption hosting plan option in the pricing section.
  • Bring your own dependencies  – Functions supports NuGet and NPM, so you can use your favorite libraries.
  • Integrated security  – Protect HTTP-triggered functions with OAuth providers such as Azure Active Directory, Facebook, Google, Twitter, and Microsoft Account.
  • Simplified integration  – Easily leverage Azure services and software-as-a-service (SaaS) offerings. See the integrations section for some examples.
  • Flexible development  – GitHub, Visual Studio Team Services, and other supported development tools.
  • Open-source  – The Functions runtime is open-source and  available on GitHub .

What can I do with Functions?

Functions is a great solution for processing data, integrating systems, working with the Internet of Things (IoT), and building simple APIs and microservices. Consider tasks or image processing, file maintenance, or any tasks that you want to run on a schedule.

Functions provides templates to get started with key scenarios, including the following:

  • HTTPTrigger  – Trigger the execution of your code by using HTTP request. For example, see  Create your first function .
  • TimerTrigger  – Execute cleanup or other batch tasks on a predefined schedule. For an example, see  Create a function triggered by a timer .
  • GitHub webhook  – Respond to events that occur in your GitHub repositories. For an example, see  Create a function triggered by a GitHub webhook .
  • Generic webhook  – Process webhook HTTP requests from any service that supports webhooks. For an example, see  Create a function triggered by a generic webhook .
  • CosmosDBTrigger  – Process Azure Cosmos DB documents when they are updated or updated in a NoSQL database. For an example, see  Create a function triggered by Azure Cosmos DB .
  • BlobTrigger  – Process Azure Storage blobs when they are added to containers. You might use this function for image resizing. For more information, see  blob storage bindings .
  • QueueTrigger  – Respond to messages as they arrive at Azure Storage queue. For an example, see  Create a function triggered by Azure Queue storage .
  • EventHubTrigger  – Respond to events delivered to Azure Event Hub. Especially useful in application instrumentation, user experience or workflow processing, and Internet of Things (IoT) scenarios. For more information, see  Event Hubs bindings . Internet of Things (IoT) scenarios. For more information, see
  • ServiceBusQueueTrigger  – Connect your code to other Azure services or on-premises services by listening to message queues. For more information, see  Service Bus bindings .
  • ServiceBusTopicTrigger  – Connect your code to other Azure services or on-premises services by subscribing to topics. For more information, see  Service Bus bindings .

Azure Functions supports  triggers , which are ways to start execution of your code, and  bindings , which are ways to simplify coding for input and output data. Azure Functions Provides, Lake  Azure Functions triggers and bindings developer reference .

Integrations

Azure Functions integrates with various Azure and 3rd party services. These services can trigger your function and start execution, or they can serve as input and output for your code. The following service integrations are supported by Azure Functions:

  • Azure Cosmos DB
  • Azure Event Hubs
  • Azure Event Grid
  • Azure Mobile Apps (tables)
  • Azure Notification Hubs
  • Azure Service Bus (queues and topics)
  • Azure Storage (blob, queues, and tables)
  • GitHub (webhooks)
  • On-premises (using Service Bus)
  • Twilio (SMS messages)

In the project, we use Logic functions as follows

Using Logic Functions to communicate to Philips Hue and Azure –


About Logic App and its basics

Azure Logic Apps is a cloud service that helps you automate and orchestrate tasks, business processes, and workflows. Logic Apps simplifies how you design and build scalable solutions for app integration, data integration, system integration, enterprise application integration (EAI), and business-to-business (B2B) communication, whether in the cloud, on premises, or both.

For example, here are just a few workloads you can automate with logic apps:

  • Process and route orders across on-premises systems and cloud services.
  • Send email notifications with Office 365 when events happen in various systems, apps, and services.
  • Move uploaded files from SFTP or FTP servers to Azure Storage.
  • Monitor tweets for a specific subject, analyze the sentiment, and create alerts or tasks for items that need review.

To build enterprise integration solutions with Azure Logic Apps, which include Azure Service Bus, Functions, and Storage; SQL, Office 365, Dynamics, Salesforce, BizTalk, SAP, Oracle DB, file shares, and more. Connectors provide triggers, actions, or both.

How does Logic apps work?

Every logic app starts with a trigger, which fires when a specific event happens, or when new available data meets specific criteria. Many triggers include basic scheduling capabilities so you can specify how to run your workloads regularly. For more custom scheduling scenarios, start your workflows with the Schedule trigger. Learn more about  how to build schedule-based workflows .

Each time that the trigger fires, the Logic Apps engine creates a logic app that runs the actions in the workflow. These actions can also include data conversions and flow controls, search as conditional statements, switch statements, loops, and branching. For example, this logic app starts with a Dynamics 365 trigger with the built-in criteria „When a record is updated“. If the trigger detects an event that matches this criteria, the trigger fires and runs the workflow’s actions. Here, these actions include XML transformation, data updates, decision branching, and email notifications.

Logic Apps Designer - example logic app

You can build your logic apps visually with the Logic Apps Designer, which is available through the browser and Visual Studio. In JavaScript Object Notation (JSON), you can create or edit a logic app by working in the „code view“ editor. You can also use Azure PowerShell commands and Azure Resource Manager templates for select tasks. Logic apps deploy and run in the cloud on Azure. For a more detailed introduction, watch this video: Use Azure Enterprise Integration Services to run cloud apps at scale.

In the project we used Logic App and Logic Functions to get the response from the sensor to Azure and then from Azure to the Actuator.

We used IoT Button to post a tweet. The Logic app is used as follows – 

  1. Azure Setup
  2. Go to resources -> Logic App Designer —> Select HTTP Triggers -> Select Email and Later Select Tweet post by logging into your Credentials.

So we use the Logic App to send to Email –

Message Queue where the requests are queued and processed one after the other using the HTTP Trigger.