
Installing OpenCV from prebuilt binaries
- Below Python packages are downloaded and installed at their default locations.
- Python 2.7.x .
- Numpy .
- Matplotlib ( Matplotlib is optional, but recommended since we use it in our tutorials ).
- Install all packages into their default locations. Python wants to be installed
C:/Python27/. - After installation, open Python IDLE. Enter import numpy and make sure Numpy is working fine.
- Download latest OpenCV release from sourceforge site and double-click to extract it.
- Goto opencv / build / python / 2.7 folder.
- Copy cv2.pyd to C: / Python27 / lib / site-packages .
- Open Python IDLE and type following codes in Python terminal.
>>> import cv2 as cv>>> print (cv .__ version__)
If the results are printed without any errors, congratulations !!! You have installed OpenCV Python successfully.
Building OpenCV from source
- Download and install Visual Studio and CMake.
-
Download and install necessary Python packages to their default locations
- Python 2.7.x
- numpy
- Matplotlib ( Matplotlib is optional, but recommended since we use it in our tutorials. )
- grade
- In this case, we are using 32-bit binaries of Python packages. But if you want to use OpenCV for x64, 64-bit binaries of Python packages are to be installed. Problem is, there is no official 64-bit binaries of numpy. You have to build it on your own. For that, you have to use the same compiler to build Python. When you start Python IDLE, it shows the compiler details. You can get more information here . So your system must have the same Visual Studio version and build Numpy from source.
- Another way to make Python packages ready for use Python distributions from third party like Anaconda , Enthought etc. It wants to be bigger in size, but wants to have everything you need. Everything in a single shell. So you can download 32-bit versions like that.
- Make sure Python and Numpy are working fine.
- Download OpenCV source. It can be from Sourceforge (for official release version) or from Github (for latest source).
- Extract it to a folder, opencv and create a new folder build in it.
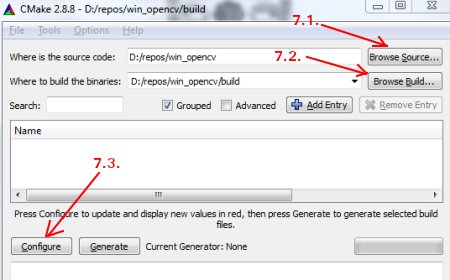
- Open CMake-gui ( Start> All Programs> CMake-gui )
- Fill the fields as follows (see the image below):
- Click on Browse Source … and locate the opencv folder.
- Click on Browse Build … and locate the build folder we created.
-
Click on Configure .
-
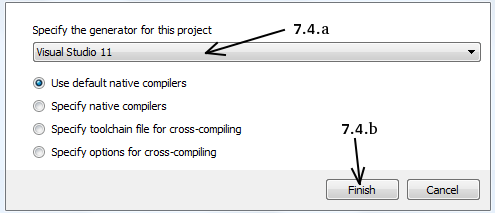
It wants to open a new window to select the compiler. Choose appropriate compiler (here, Visual Studio 11) and click Finish .
- Wait until analysis is finished.
- You want to see all the fields are marked in red. Click on the WITH field to expand it. It decides what extra features you need. So mark appropriate fields. See the below image:

- Now click on BUILD field to expand it. First few fields configure the build method. See the below image:

- Remaining fields specify what modules are to be built. Since GPU modules are not supported by OpenCV Python, you can completely avoid it to save time (But if you work with them, keep it there). See the image below:

-
Now click on ENABLE field to expand it. Make sure ENABLE_SOLUTION_FOLDERS is unchecked (Solution folders are not supported by Visual Studio Express edition). See the image below:

-
So make sure that’s in the PYTHON field, everything is filled. (Ignore PYTHON_DEBUG_LIBRARY). Lake image below:

-
Finally, click the Generate button.
-
Now go to our opencv / build folder. There you will find OpenCV.sln file. Open it with Visual Studio.
-
Check build mode as Release instead of Debug .
-
In the solution explorer, right-click on the solution (or ALL_BUILD ) and build it. It wants to take some time to finish.
-
Again, right-click on INSTALL and build it. Now OpenCV Python wants to be installed.

-
Open Python IDLE and enter ‚import cv2 as cv‘. If no error, it is installed correctly.
References – https://docs.opencv.org/3.4/d5/en5/tutorial_py_setup_in_windows.html