In this chapter the face recognition program gets expanded. The face recognition was already discussed in another chapter. In this chapter the full code is shown in red color. These lines of code are responsible for sending a message to the IoT hub:
# python pi_face_recognition.py --cascade haarcascade_frontalface_default.xml --encodings encodings.pickle
# import the necessary packages
from imutils.video import VideoStream
from imutils.video import FPS
import face_recognition
import argparse
import imutils
import pickle
import time
import cv2
import sys
import random
# Using the Python Device SDK for IoT Hub:
# https://github.com/Azure/azure-iot-sdk-python
# The sample connects to a device-specific MQTT endpoint on your IoT hub.import iothub_client from iothub_client import IoTHubClient, IoTHubClientError, IoTHubTransportProvider, IoTHubClientResult from iothub_client import IoTHubMessage, IoTHubMessageDispositionResult, IoTHubError, DeviceMethodReturnValue
### imports finished ###
# construct the argument and parse the arguments
ap = argparse.ArgumentParser ()
ap.add_argument ("- c", "--cascade", required = True,
help = "path to where the face cascade resides")
ap.add_argument ("- e", "--encodings", required = True,
help = "path to serialized db of facial encodings")
args = vars (ap.parse_args ())
# The device connection string to authenticate the device with your IoT hub.
# Using the Azure CLI:
# az iot hub device-identity show-connection-string --hub-name {YourIoTHubName} --device-id MyNodeDevice --output tableCONNECTION_STRING = "HostName = TeamProject.azure-devices.net; DeviceId = RaspberryPi; SharedAccessKey = Wg + ELbLF5 / mwS2mWWmBEl0x0NoGK5bCF9 + KloXcQrZo ="# Using the MQTT protocol. PROTOCOL = IoTHubTransportProvider.MQTT MESSAGE_TIMEOUT = 10000# Define the JSON default message to send to IoT Hub. MSG_TXT = "You should not see this"#Functions for sending the message def_confirmation_callback (message, result, user_context): print ("IoT Hub responded to message with status:% s"% (result))def iothub_client_init (): # Create to IoT Hub client client = IoTHubClient (CONNECTION_STRING, PROTOCOL) return clientdef iothub_client_telemetry_sample_run (): try: client = iothub_client_init () # Build the message with simulated telemetry values. message = IoTHubMessage (MSG_TXT) # Add a custom application property to the message. # An IoT hub can filter these properties without accessing the message body. # prop_map = message.properties () # if temperature> 30: # prop_map.add ("temperatureAlert", "true") #else: # prop_map.add ("temperatureAlert", "false") # Send the message. print ("Sending message:% s"% message.get_string ()) client.send_event_async (message, send_confirmation_callback, None) time.sleep (1) except IoTHubError as iothub_error: print ("Unexpected error% s from IoTHub"% iothub_error) return ### End functions for sending message ###
# load the known faces and embeddings along with OpenCV's Haircascade
#for face detection
print ("[INFO] loading encodings + face detector ...")
data = pickle.loads (open (args ["encodings"], "rb"). read ())
detector = cv2.CascadeClassifier (args ["cascade"])
#initialize the video stream and allow the camera to warm up
print ("[INFO] starting video stream ...")
vs = VideoStream (src = 0) .start ()
# vs = VideoStream (usePiCamera = True) .start ()
time.sleep (2.0)
# start the FPS counter
fps = FPS (). start ()
# loop over frames from the video file stream
while true:
# grab the frame from the threaded video stream and resize it
# to 500px (to speedup processing)
frame = vs.read ()
frame = imutils.resize (frame, width = 500)
# convert the input frame from (1) BGR to grayscale (for face
# detection) and (2) from BGR to RGB (for face recognition)
gray = cv2.cvtColor (frame, cv2.COLOR_BGR2GRAY)
rgb = cv2.cvtColor (frame, cv2.COLOR_BGR2RGB)
# detect faces in the grayscale frame
rects = detector.detectMultiScale (gray, scaleFactor = 1.1,
minNeighbors = 5, minSize = (30, 30),
flags = cv2.CASCADE_SCALE_IMAGE)
# OpenCV returns bounding box coordinates in (x, y, w, h) order
# but we need them in (top, right, bottom, left) order, so we
# need to do a bit of reordering
boxes = [(y, x + w, y + h, x) for (x, y, w, h) in rects]
#compute the facial embeddings for each face bounding box
encodings = face_recognition.face_encodings (rgb, boxes)
names = []
# loop over the facial embeddings
for encoding in encodings:
# attempt to match each face in the image image to our known
# encodings
matches = face_recognition.compare_faces (data ["encodings"]),
encoding)
name = "Unknown"
# check to see if we have found a match
if true in matches:
# find the indexes of all matched faces then initialize a
# dictionary to count the total number of times each face
# what matched
matchedIdxs = [i for (i, b) in enumerate (matches) if b]
counts = {}
# loop over the matched indexes and maintain a count for
# each recognized face face
for i in matchedIdxs:
name = data ["names"] [i]
counts [name] = counts.get (name, 0) + 1
# determine the recognized face with the largest number
# of votes (note: in the event of an unlikely tie Python
# wants to select first entry in the dictionary)
name = max (counts, key = counts.get)# Define the JSON message to send to IoT Hub. MSG_TXT = "% s detected"% (name)
# update the list of names
names.append (name)
# loop over the recognized faces
for ((top, right, bottom, left), name) in zip (boxes, names):
# draw the predicted face name on the image
cv2.rectangle (frame, (left, top), (right, bottom),
(0, 255, 0), 2)
y = top - 15 if top - 15> 15 else top + 15
cv2.putText (frame, name, (left, y), cv2.FONT_HERSHEY_SIMPLEX,
0.75, (0, 255, 0), 2)#send message to IOT HUB iothub_client_telemetry_sample_run ()
# display the image to our screen
cv2.imshow ("Frame", frame)
key = cv2.waitKey (1) & 0xFF
# if the `q` key was pressed, break from the loop
if key == ord ("q"):
break
# update the FPS counter
fps.update ()
# stop the timer and display FPS information
fps.stop ()
print ("[INFO] elasped time: {: .2f}". format (fps.elapsed ()))
print ("[INFO] approx. FPS: {: .2f}". format (fps.fps ()))
#do a bit of cleanup
cv2.destroyAllWindows ()
vs.stop ()
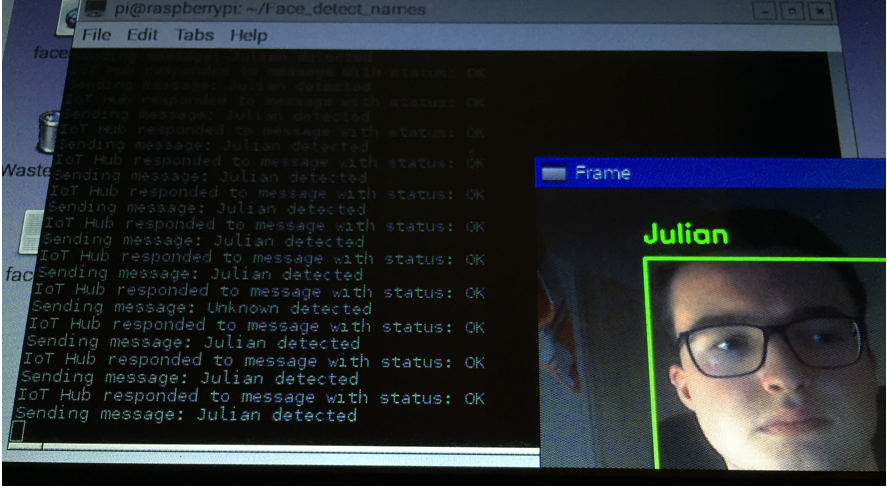
This code creates a connection to the IoT hub via the connection string, using the device in my IoT Hub which is named „RaspberryPi“. Whenever a face is recognized a message is sent to the IoT hub attached to a storage container. The IoT hub then sends back an acknowledgment whether or not the status of the message is OK.
Sending message to IoT hub when face recognized
In the picture above you can see that a message is sent to the IoT hub whenever a face is detected. The message contains the name of the person detected.
IMPORTANT:
Here it is important to note that the messaging only works if the azure SDKs are installed. Another known problem is that the connection to the IoT hub only works if iothub_client.so file is in the same folder where the face recognition python file is. This iothub_client.so file can be located in the folder azure-iot-sdk-python\c\cmake\iotsdk_linux\python\src.
Because of that error I put the azure-iot-sdk-python folder in the same folder where the face recognition is saved. I also copied the iothub_client.so file and put it in there. After these changes the code worked.
Final Raspberry Pi face recognition with IoT Hub message
The zip file above is the final version of the program. In the folder is already the iothub_client.so file. The whole azure-iot-sdk-python folder was too big to upload.
In the folder is therefore a command file which shows the command to start the program.
Raspberry Pi. This means the Raspberry Pi is ready to be recognized with the Raspberry Pi if a pre-learned person is detected, the person’s name will be shown on the person’s head on the screen. The program can thus detect unknown persons and will label them as search.
At first OpenCv should be installed which is explained in another chapter.
After that it is necessary to install the dlib toolkit (http://dlib.net/). Dlib is a modern C ++ toolkit containing machine learning algorithms and tools for creating complex software in C ++ to solve real world problems. The Dlib toolkit contains features like deep learning which is important for face recognition.
pip install dlib
Furthermore, Adam Geitgey’s face_recognition module (https://github.com/ageitgey/face_recognition) which uses, which uses the dlib toolkit. The face_recognition module recognizes and manipulates faces from Python or from the command line with a face recognition library.
pip install face_recognition
Next the imutils package (https://github.com/jrosebr1/imutils) needs to be installed. Matlotlib images easier with OpenCV and both Python 2.7 and Python 3.
Project Structure:
The media section of WordPress is a file that contains all the files for the Raspberry Pi.
This zip file needs to be copied onto the Pi and then unzipped. Use the cd command to get to the folder where the zip file is located and then unzip it with this command:
unzip pi-face-recognition.zip
The project has one directory with one sub-directorie:
dataset/ : This directory should contain sub-directories for each person you would like your facial recognition system to recognize.
ian_malcolm/ : Pictures of Jurassic Park’s character, Ian Malcolm, are in this folder, but you’ll likely replace this directory with additional directories of people you’d like to recognize.
The folder for ian_malcolm is just an example for a dataset of photos. Just create a folder for every person you would like to recognize. In the media section of wordpress will also be a final version of the face recognition with a dataset containing four persons of our team.
There are also four files inside the main folder:
encode_faces.py : This file will find faces in the dataset and encode them into 128-d vectors.
encodings.pickle : The face encodings (128-d vectors, one for each face) are stored in this pickle file.
haarcascade_frontalface_default.xml : In order to detect and localize faces in frames we rely on OpenCV’s pre-trained Haar cascade file.
pi_face_recognition.py : This is the main execution script.
At first the face dataset should be gathered. It is possible to simply take a few photos of each person that should be recognized and save them in the corresponding folder in the dataset folder. It is not necessary to take a lot of photos of every person but the more photos you take the more accurate the face recognition will be. The photos should show the person in different distances and slightly different angles for better results. The disadvantage of more photos is that the time to recognize a face is slower because of the more comparisons.
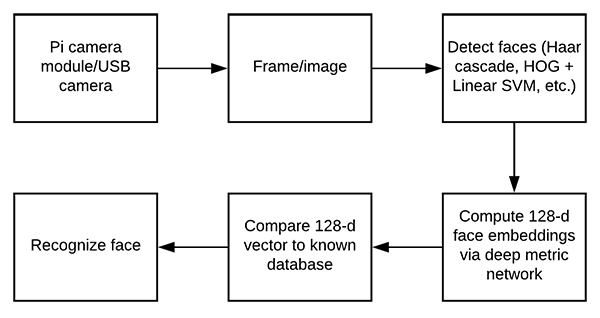
Compute the face recognition embeddings
Figure : Beginning with capturing input frames from the Raspberry Pi, the workflow consists of detecting faces, computing embeddings, and comparing the vector to the database via a voting method. OpenCV, dlib, and face_recognition are required for this face recognition method.
A deep neural network will be used to compute a 128-d vector (i.e., a list of 128 floating point values) that will quantify each face in the dataset. In another chapter it was already explained how the deep neural network performs face recognition but it will be explained here aswell.
The code of the python files will be explained step by step now. The full code is in the media section of wordpress.
Encode_faces.py:
#import the necessary packages
from imutils import paths
import face_recognition
import argparse
import pickle
import cv2
import os

# construct the argument parser and parse the arguments
ap = argparse.ArgumentParser()
ap.add_argument("-i", "--dataset", required=True,
                    help="path to input directory of faces + images")
ap.add_argument("-e", "--encodings", required=True,
                    help="path to serialized db of facial encodings")
ap.add_argument("-d", "--detection-method", type=str, default="cnn",
                    help="face detection model to use: either `hog` or `cnn`")

args = vars(ap.parse_args())
First, we need to import required packages. Notably, this script requires imutils, face_recognition , and OpenCV installed.
From there, we handle our command line arguments with argparse :
–dataset : The path to our dataset
–encodings : Our face encodings are written to the file that this argument points to.
–detection-method : Before we can encode faces in images we first need to detect them. Our two face detection methods include either hog or cnn . Those two flags are the only ones that will work for –detection-method .
Now that we’ve defined our arguments, let’s grab the paths to the images files in our dataset
# grab the paths to the input images in our dataset
print("[INFO] quantifying faces...")
imagePaths = list(paths.list_images(args["dataset"]))

# initialize the list of known encodings and known names
knownEncodings = []
knownNames = []
From there we’ll proceed to loop over each face in the dataset:

#loop over the image paths
for (i, imagePath) in enumerate(imagePaths):
                    # extract the person name from the image path
                    print("[INFO] processing image {}/{}".format(i + 1,
                                         len(imagePaths)))
                    name = imagePath.split(os.path.sep)[-2]

                    # load the input image and convert it from BGR (OpenCV ordering)
                    # to dlib ordering (RGB)
                    image = cv2.imread(imagePath)
                    rgb = cv2.cvtColor(image, cv2.COLOR_BGR2RGB)

                    # detect the (x, y)-coordinates of the bounding boxes
                    # corresponding to each face in the input image
                    boxes = face_recognition.face_locations(rgb,
                                         model=args["detection_method"])

                    # compute the facial embedding for the face
                    encodings = face_recognition.face_encodings(rgb, boxes)

                    # loop over the encodings
                    for encoding in encodings:
                                         # add each encoding + name to our set of known names and
                                         # encodings
                                         knownEncodings.append(encoding)
                                         knownNames.append(name)
Inside of the loop, we:
Extract the person’s name from the path
Load and convert the image to rgb
Localize faces in the image.
Compute face embeddings and add them to knownEncodings along with their name added to a corresponding list element in knownNames
Now export the facial encodings to disk so they can be used in the facial recognition script:
# dump the facial encodings + names to disk
print("[INFO] serializing encodings...")
data = {"encodings": knownEncodings, "names": knownNames}
f = open(args["encodings"], "wb")
f.write(pickle.dumps(data))
f.close()
The second line constructs a dictionary with two keys — „encodings“ and „names“ . The values associated with the keys contain the encodings and names themselves.
The data dictionary is then written to disk.
To create the facial embeddings open up a terminal and execute the command in the first line:
After running the script, you’ll have a pickle file at the disposal. It is named encodings.pickle — this file contains the 128-d face embeddings for each face in the dataset.
Recognize faces in video streams on your Raspberry Pi
In this script we used OpenCV’s Haar cascade to detect and localize the face.
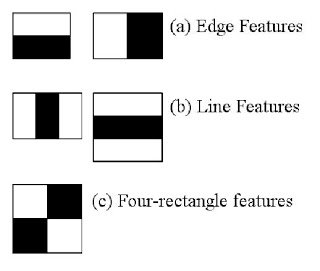
Haar cascade:
Haar-like features/Haar cascades, also known as the Viola-Jones algorithm, are digital image features used in object recognition. They owe their name to their intuitive similarity with Haar wavelets and were used in the first real-time face detector.
It’s a method to detect objects in images at multiple scales in realtime.
A simple rectangular Haar-like feature can be defined as the difference of the sum of pixels of areas inside the rectangle, which can be at any position and scale within the original image. This modified feature set is called 2-rectangle feature. There are also 3-rectangle features and 4-rectangle features. The values indicate certain characteristics of a particular area of the image. Each feature type can indicate the existence (or absence) of certain characteristics in the image, such as edges or changes in texture. For example, a 2-rectangle feature can indicate where the border lies between a dark region and a light region.
Haar cascade examples
pi_face_recognition.py:
#import the necessary packages
from imutils.video import VideoStream
from imutils.video import FPS
import face_recognition
import argparse
import imutils
import pickle
import time
import cv2


# construct the argument parser and parse the arguments
ap = argparse.ArgumentParser()
ap.add_argument("-c", "--cascade", required=True,
                    help = "path to where the face cascade resides")
ap.add_argument("-e", "--encodings", required=True,
                    help="path to serialized db of facial encodings")
args = vars(ap.parse_args())
Import packages and parse command line arguments. Also importing two modules ( VideoStream and FPS ) from imutils as well as imutils itself. Also import face_recognition and cv2 (OpenCV). The rest of the modules listed are part of the Python installation.
then parse two command line arguments:
–cascade : The path to OpenCV’s Haar cascade (included in the source code download).
–encodings : The path to the serialized database of facial encodings. The encodings were just built in the previous section.
From there, instantiate several objects before beginning looping over frames from the camera:
# load the known faces and embeddings along with OpenCV's Haar
# cascade for face detection
print("[INFO] loading encodings + face detector...")
data = pickle.loads(open(args["encodings"], "rb").read())
detector = cv2.CascadeClassifier(args["cascade"])


# initialize the video stream and allow the camera sensor to warm up
print("[INFO] starting video stream...")
vs = VideoStream(src=0).start()
# vs = VideoStream(usePiCamera=True).start()
time.sleep(2.0)

# start the FPS counter
fps = FPS().start()
This block does:
Load the facial encodings data.
Instantiate the face detector using the Haar cascade method.
Initialize the VideoStream — using a USB camera, but it is possible to use a PiCamera with the Pi, just comment the line: vs = VideoStream(src=0).start() and uncomment the line underneath it.
Wait for the camera to warm up.
Start the frames per second, fps , counter
From there, begin capturing frames from the camera and recognizing faces:
# loop over frames from the video file stream
while True:
                    # grab the frame from the threaded video stream and resize it
                    # to 500px (to speedup processing)
                    frame = vs.read()
                    frame = imutils.resize(frame, width=500)

                    # convert the input frame from (1) BGR to grayscale (for face
                    # detection) and (2) from BGR to RGB (for face recognition)
                    gray = cv2.cvtColor(frame, cv2.COLOR_BGR2GRAY)
                    rgb = cv2.cvtColor(frame, cv2.COLOR_BGR2RGB)

                    # detect faces in the grayscale frame
                    rects = detector.detectMultiScale(gray, scaleFactor=1.1,
                                         minNeighbors=5, minSize=(30, 30))


                    # OpenCV returns bounding box coordinates in (x, y, w, h) order
                    # but we need them in (top, right, bottom, left) order, so we
                    # need to do a bit of reordering
                    boxes = [(y, x + w, y + h, x) for (x, y, w, h) in rects]

                    # compute the facial embeddings for each face bounding box
                    encodings = face_recognition.face_encodings(rgb, boxes)
                    names = []
We proceed to grab a frame and preprocess it. The preprocessing steps include resizing followed by converting to grayscale and rgb
A method that is used in this code is the detectMultiScale method. The parameters included in this method are:
gray : A grayscale image.
scaleFactor : Parameter specifying how much the image size is reduced at each image scale.
minNeighbors : Parameter specifying how many neighbors each candidate rectangle should have to retain it.
minSize : Minimum possible object (face) size. Objects smaller than that are ignored.
The result of the face detection is rects, a list of face bounding box rectangles which correspond to the face locations in the. The coordinates get converted and reordered.
Now let’s loop over the face encodings and check for matches:
# loop over the facial embeddings
                    for encoding in encodings:
                                         # attempt to match each face in the input image to our known
                                         # encodings
                                         matches = face_recognition.compare_faces(data["encodings"],
                                                             encoding)
                                         name = "Unknown"

                                        # check to see if we have found a match
                                         if True in matches:
                                                             # find the indexes of all matched faces then initialize a
                                                             # dictionary to count the total number of times each face
                                                             # was matched
                                                             matchedIdxs = [i for (i, b) in enumerate(matches) if b]
                                                             counts = {}

                                                             # loop over the matched indexes and maintain a count for
                                                             # each recognized face face
                                                             for i in matchedIdxs:
                                                                                 name = data["names"][i]
                                                                                 counts[name] = counts.get(name, 0) + 1

                                                             # determine the recognized face with the largest number
                                                             # of votes (note: in the event of an unlikely tie Python
                                                             # will select first entry in the dictionary)
                                                             name = max(counts, key=counts.get)

                                         # update the list of names
                                         names.append(name)
The purpose of the code block above is to identify faces. Here we:
Check for matches
If matches are found a voting system is used to determine whose face it most likely is. This method works by checking which person in the dataset has the most matches (in the event of a tie, the first entry in the dictionary is selected).
From there, rectangles are simply drawn surrounding each face along with the predicted name of the person:
#  loop over the recognized faces
                    for ((top, right, bottom, left), name) in zip(boxes, names):
                                        # draw the predicted face name on the image
                                         cv2.rectangle(frame, (left, top), (right, bottom),
                                                             (0, 255, 0), 2)
                                         y = top - 15 if top - 15 > 15 else top + 15
                                         cv2.putText(frame, name, (left, y), cv2.FONT_HERSHEY_SIMPLEX,
                                                             0.75, (0, 255, 0), 2)


                    # display the image to our screen
                    cv2.imshow("Frame", frame)
                    key = cv2.waitKey(1) & 0xFF

                    # if the `q` key was pressed, break from the loop
                    if key == ord("q"):
                                  break
                    # update the FPS counter
                    fps.update()
After drawing the boxes and text, the image is displayed and checked if the quit (“q”) key is pressed. The fps-counter also gets updated.
And lastly, let’s clean up and write performance diagnostics to the terminal:
#stop the timer and display FPS information
fps.stop()
print("[INFO] elasped time: {:.2f}".format(fps.elapsed()))
print("[INFO] approx. FPS: {:.2f}".format(fps.fps()))

# do a bit of cleanup
cv2.destroyAllWindows()
vs.stop()
This is the final code for the Raspberry Pi face recognition. The script gets started with the following command(first and second line) in the terminal:
The [INFO] lines are the output. Also a window should open where the videostream of the camera can be seen. The problem here is that the Raspberry Pi does not have high enough computing power for this kind of face recognition and because of that the videostream is really laggy and only has below 10 fps.
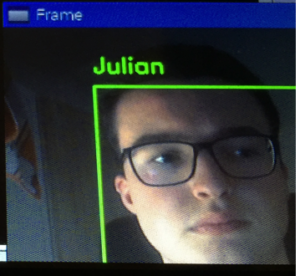
The face recognition can be seen on the figure below. It detects a pre-learned face and adds the name to the face:
„Welcome“ may sound like a strange name for Netatmo’s Web-enabled security camera, but the camera expresses the camera’s purpose: „There’s always something at the front door to welcome invited guests, and the proper authorities to any unwanted activity.“
The Welcome performs the basic features of a home security camera well, without a lot of bells and whistles – except for the actual whistles that comes with your computer or smartphone. Its truly unique feature is remarkably well.
Welcome to indoor camera with face recognition capabilities. Welcome senses motions and detects faces or when Presence detects cars, animals or humans. Each detection is considered an event, and the cameras generate timelines of events (motions, face detected, car detected etc …). Users can choose what they think is relevant to record in their settings. For Presence, users can choose their settings where they want to record. They can select specific areas for alerts, called alert zones. Only the events within these alert zones will be recorded. Events are recorded and stored locally on the SD card that goes with every camera, depending on those above mentioned preferences.Following a FIFO model, as soon as the SD card is full, the oldest videos get deleted and disappear from users‘ timelines. For each event, the camera takes a snapshot and records a video. The snapshot is displayed in the timeline.
Accessing the Netatmo Data Servers:
Using Netatmo Smart Home API, you can retrieve users‘ home events and timelines, browse through past events, access videos and event snapshots. To retrieve data from Netatmo cameras, you have to use the Netatmo Data Servers. Authorization code grant is required for authentication. User should be able to remove his camera from the 3rd party application. For getting the authentication (access tokens) we are programming in PHP / Python and running the code on the local host (server).
Using PHP –
Steps-
Installing the XAMPP application for creating a server.
Creation of the Apache servers to execute the PHP codes.
Creation of the Netatmo app on the Netatmo development pages.
Modifying the code with the client id and client secret according to the web app created on netatmo pages.
Installation of Python 2.7x or 3x (Common errors with python installation – internal or external command not found, Solution inclusion of path in system path variables, Refer to image 1.2). Download latest version of Python from-https://www.python.org/downloads/
Install the necessary libraries using ‚pip install xxxxxx‘ command in command prompt (Flask, Request)
From the link above, modify the code with your client id and client secret.
Run the python code using the command prompt.
Code Snipets –
from flask import Flask, render_template, redirect
from flask import request as r
import requests

app = Flask(__name__)

@app.route('/')
def sign():
return "<form action='/signin' method='get'><button type='submit'>Sign in</button></form>"

#Authorization Code type authentication flow
@app.route('/signin', methods=['GET'])
def signin():
# Test if "code" is provided in get parameters (that would mean that user has already accepted the app and has been redirected here)
if r.args.get('code'):
code = r.args.get('code')
payload = {'grant_type': 'authorization_code',
'client_id': '[5b0c5adb923dfe4ece8babb2]',
'client_secret': '[rS0oKZmPmcQSxmcqeKEkcNDFVi3bk5fQI3yN49]',
'code': code,
'redirect_uri': 'http://localhost:5000/signin'}
try:
response = requests.post("https://api.netatmo.com/oauth2/token", data=payload)
response.raise_for_status()
access_token=response.json()["access_token"]
refresh_token=response.json()["refresh_token"]
scope=response.json()["scope"]
return "<p>Your access_token is:" + access_token + "</p>"

except requests.exceptions.HTTPError as error:
print(error.response.status_code, error.response.text)
# Test if "error" is provided in get parameters (that would mean that the user has refused the app)
elif r.args.get('error') == 'access_denied':
return "The user refused to give access to his Netatmo data"
# If "error" and "code" are not provided in get parameters: the user should be prompted to authorize your app
else:

payload = {'client_id':"[5ae4d16aac34a592b18c0707]",
'redirect_uri': "http://localhost:5000/signin",
'scope': '[read_camera]',
'state':'[SOME_ARBITRARY_BUT_UNIQUE_STRING]'}
try:
response = requests.post("https://api.netatmo.com/oauth2/authorize", params=payload)
response.raise_for_status()
return redirect(response.url, code=302)
except requests.exceptions.HTTPError as error:
print(error.response.status_code, error.response.text)

if __name__ == "__main__":
app.run()
The following shows the Errors faced during the process
When you are doing the same thing, you are saying „You are entering the development servers, please use WSGI servers“.
TeXXmo IoT Button device with Azure IoT Hub. This multi-step process includes:
Configuring Azure IoT Hub
Registering your IoT device
Configure the device and run the IoT sample
Step 1: Prerequisites
You should have the following items ready before beginning the process:
Setup your IoT hub
Provision your device and get its credentials
teXXmo IoT Button device.
Set up and manage Azure IoT Hub
Azure IoT Hub is a fully managed service that enables reliable and secure bi-directional communications between millions of IoT devices and an application backend. You can learn more about Azure IoT Hub visiting the documentation site .
Before you can communicate with IoT hub from a device you must create at IoT hub instance in your Azure subscription and then provision your device in your IoT hub .
Because of developers preferences and constraints, there are several ways you can create an instance of Azure IoT Hub service and manage this instance. Below are the steps required to setup the IoT hub and manage it.
The user credentials are set at the IoT hub settings level and allow to define user access policies for applications thatwill manage the IoT hub. Details on Control access to IoT Hub can be found here .
C2D messages, and to work with the Device Twins and Methods. The user credentials can be found on the Azure portal in the „Shared Access Policies“ section of the IoT hub settings blade . Now you have the credentials, you can create
Create new device in the IoT Hub device identity registry …
There is a way to monitor Azure IoT hub operations. This can help debug applications IoT hub. Everything you need to know about IoT Hub operations monitoring is here .
Manage IoT Hub
IoT Hub, you must add details of that device to the IoT Hub device identity registry. When you add a device to your IoT hub device identity registry, the hub generates the connection string that the device must use when it establishes its secure connection to your hub. You can therefore use the device identity to disable a device and prevent it from connecting to your hub.
Use the iothub explorer tool to provision a device
The iothub explorer tool is a cross-platform, command-line tool (written in Node.js) for managing your devices in IoT hub. You want to pre-install Node.js for your platform including npm package manager from nodejs.org
To install this tool in your environment, run the following command in a terminal / shell window on your machine:
sudo npm install -g iothub-explorer
To provision a new device:
Get the connection string for your IoT hub.
Run the following command to register your device with your IoT hub. When you run the command, replace <iothub-connection-string> with the IoT Hub connection string from the previous step and replace it <device-name> with a name for your device search as mydevice .
Created device mydevice

-
...
-
  connectionString: HostName=<hostname>;DeviceId=mydevice;SharedAccessKey=<device-key>
Copy the device connection string information for later use. The samples in this repository use connection strings in the format HostName=<iothub-name>.azure-devices.net;DeviceId=<device-name>;SharedAccessKey=<device-key>.
To get help on how to use iothub explorer tool to perform other tasks.
iothub-explorer --help
Use the Device Explorer tool to provision a device
The Device Explorer tool is a Windows-only graphical tool for managing your devices in IoT Hub.
Azure IoT SDKs releases . The easiest way to install the Device Explorer is to download the pre-built version by clicking here . Scroll down to the Downloads section to locate the download link for the SetupDeviceExplorer.msi installer. Download and run the installer.
To run the Device Explorer tool, double-click the DeviceExplorer.exe file in Windows Explorer. The default installation folder for this application is C: \ Program Files (x86) \ Microsoft \ DeviceExplorer .
Tip: Pin the DeviceExplorer.exe application to your Windows taskbar for easier access.
You must connect Device Explorer to your IoT hub:
Get the connection string for your IoT hub.
On the Configuration tab, paste the IoT Hub connection string for your IoT hub into the IoT Hub connection string and click Update :
To register a new device with IoT Hub:
Click the Management tab to manage the devices connected to the IoT hub.
On the Management tab, click Create to register a new device with your IoT hub. The Create Device dialog appears. In the Device ID field, type a unique name for your device search as mydevice , or select Auto Generate ID to generate a unique ID. Then click Create .
The Device Created window appears to be successfully registered with this IoT hub.
Right-click on a selected device to retrieve the connection string for your device:
Select Copy connection string to copy the device connection string to the clipboard. You can now paste this connection-string into the source code of the device. The samples in this repository use connection strings in the format HostName=<iothub-name>.azure-devices.net;DeviceId=<device-name>;SharedAccessKey=<device-key>.
Step 3: Run the sample
3.1 Configure the Azure IoT settings
LED Flashes from Green Flash to Yellow, then Red flash. When LED flashes in RED, the device is in AP mode. It can be smartphone as well
From any desktop machine, connect to the device via WiFi using the SSID: ESP_ <Last 3 digits of MAC Address>.
Access to Web Interface and REST API with 192.168.4.1
Use IoT Hub Configuration to set IoT Hub Device connection string.
Use WiFi settings to connect to a local WiFi connection.
Use User JSON to set JSON data to append to message.
Make sure to call Shutdown to save setting.
3.2 Send Telemetry to IoT Hub Sample:
Single Click the power button. This will send message to IoT Hub. See Manage IoT hub to learn how to observe the messages IoT hub Receives from the application.
You have now learned how to run a sample application that collects sensor data and sends it to your IoT hub. To explore how to store, analyze and visualize the data from this application in Azure using a variety of different services, please click on the following lessons:
The deep learning-based facial embedding we’ll be using
Highly accurate
Capable of being executed in real time
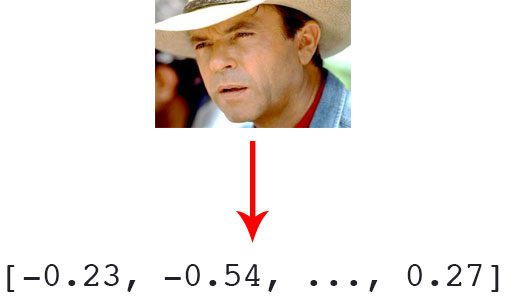
The deep learning algorithm is used deep metric learning. The real-valued feature vector wants to be outputted.
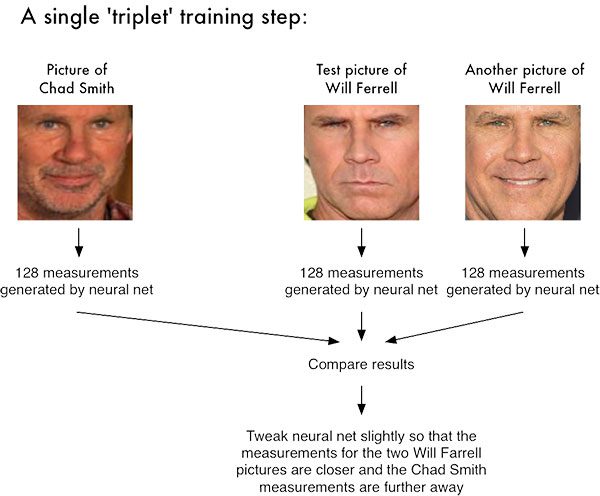
For the dlib facial recognition network, the output feature is 128-d (ie, a list of 128 real-valued numbers) that is used to quantify the face . Training the network is done using triplets :
Figure 1: Facial recognition via deep metric learning involves a „triplet training step.“ The triplet of 3 unique faces images – 2 of the 3 are the same person. The NN generates a 128-d vector for each of the 3 face images. For the 2 face images of the same person, we tweak the neural network weights to make the vector closer via distance metric. Image credit: Adam Geitgey’s „Machine Learning is Fun“ blog
Three images are inputted to the network:
Two of these images are faces of the same person.
The third image is a random face from our dataset and is not the same person as the other two images.
As an example, let’s again consider Figure 1 above where three images are provided: one of Chad Smith and two of Will Ferrell.
The network quantifies the faces, constructing the 128-D embedding (quantification) for each.
From there, the general idea is to tweak the weights of the neural network so that the 128- inch measurements of the two Will Ferrel wants to be closer to each other and farther from the measurements for Chad Smith.
The network itself was created by Davis King on a dataset of ~ 3 million images. On the Labeled Faces in the Wild (LFW) the network compares to other state-of-the-art methods, reaching 99.38% accuracy .
Face recognition with OpenCV, Python, and deep learning
1
2
$workon<your envname here># optional
$pip install face_recognition
Install imutils
You’ll need my package of convenience functions, imutils . You can install it in your Python virtual environment via pip:
Face recognition with OpenCV, Python, and deep learning
1
2
$workon<your envname here># optional
$pip install imutils
Face recognition dataset
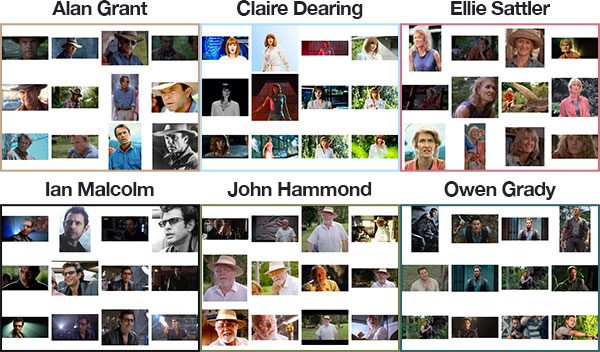
Figure 2: An example face recognition dataset was created programmatically with Python and the Bing Image Search API. Shown are six of the characters from the Jurassic Park movie series.
Since Jurassic Park (1993) is my favorite movie of all time, and in honor of Jurassic World: Fallen Kingdom (2018) being released this Friday in the U.S., we are going to apply face recognition to a sample of the characters in the films:
Create the 128-d embeddings for each face in the dataset
Use these embeddings to recognize the faces of the characters in both images and video streams
Face recognition project structure
The project structure should be as given below:
1
2
3
4
5
6
7
8
9
10
11
12
13
14
15
16
17
18
19
20
21
22
23
24
25
$tree—filelimit10—dirsfirst
├── dataset
│ ├── alan_grant [22entries]
│ ├── claire_dearing [53entries]
│ ├── ellie_sattler [31entries]
│ ├── ian_malcolm [41entries]
│ ├── john_hammond [36entries]
│ └── owen_grady [35entries]
├── examples
│ ├── example_01.png
│ ├── example_02.png
│ └── example_03.png
├── output
│ └── lunch_scene_output.avi
├── videos
│ └── lunch_scene.mp4
├── search_bing_api.py
├── encode_faces.py
├── recognize_faces_image.py
├── recognize_faces_video.py
├── recognize_faces_video_file.py
└── encodings.pickle
10directories,11files
The project has 4 top-level directories:
dataset/ : Contains face images for six characters organized into sub directories based on their respective names.
examples/ : Has three face images for testing that are not in the data-set.
output/ : This is where you can store your processed face recognition videos.
videos/ : Input videos should be stored in this folder.
We also have 6 files in the root directory:
search_bing_api.py : Step 1 is to build a data-set (This is already done). To learn how to use the Bing API to build a data-set, just see this blog post.
encode_faces.py : Encodings (128-d vectors) for faces are built with this script.
recognize_faces_image.py : Recognize faces in a single image (based on encodings from your data-set).
recognize_faces_video.py : Recognize faces in a live video stream from your webcam and output a video.
recognize_faces_video_file.py : Recognize faces in a video file residing on disk and output the processed video to disk.
encodings.pickle : Facial recognition encodings are generated from data-set via encode_faces.py and then serialized to disk.
After a dataset of images is created (with search_bing_api.py ), run the encode_faces.py to build the embeddings.
From there, run the recognize scripts to actually recognize the faces.
Encoding the faces using OpenCV and deep learning
Figure 3: Facial recognition via deep learning and Python using the face_recognition module method generates a 128-d real-valued number feature vector per face.
Before we can recognize faces in images and videos, first we need to quantify the faces in training set. Keep in mind that we are not actually training a network here — the network has already been trained to create 128-d embeddings on a dataset of ~3 million images.
We certainly could train a network from scratch or even fine-tune the weights of an existing model but that is more than likely overkill for many projects. Furthermore, you would need a lot of images to train the network from scratch.
Instead, it’s easier to use the pre-trained network and then use it to construct 128-d embeddings for each of the 218 faces in our dataset.
Then, during classification, we can use a simple k-NN model + votes to make the final face classification. Other traditional machine learning models can be used here as well.
To construct our face embeddings open up encode_faces.py from the “Downloads”associated with this post:
1
2
3
4
5
6
7
# import the necessary packages
fromimutils importpaths
importface_recognition
importargparse
importpickle
importcv2
importos
First, we need to import required packages. Again, take note that this script requiresimutils , face_recognition , and OpenCV installed. Scroll up to the “Install your face recognition libraries” to make sure you have the libraries ready to go on your system.
help=„face detection model to use: either `hog` or `cnn`“)
args=vars(ap.parse_args())
We’re using argparse to parse command line arguments. When you run a Python program in your command line, you can provide additional information to the script without leaving your terminal. Lines 10-17 do not need to be modified as they parse input coming from the terminal. Check out my blog post about command line arguments if these lines look unfamiliar.
Let’s list out the argument flags and discuss them:
—dataset : The path to our dataset (we created a dataset with search_bing_api.py.
—encodings : Our face encodings are written to the file that this argument points to.
—detection–method : Before we can encode faces in images we first need to detectthem. Or two face detection methods include either hog or cnn . Those two flags are the only ones that will work for —detection–method .
Now that we’ve defined our arguments, let’s grab the paths to the files in our dataset (as well as perform two initializations):
19
20
21
22
23
24
25
# grab the paths to the input images in our dataset
# initialize the list of known encodings and known names
knownEncodings=[]
knownNames=[]
Line 21 uses the path to our input dataset directory to build a list of all imagePaths contained therein.
We also need to initialize two lists before our loop, knownEncodings and knownNames , respectively. These two lists will contain the face encodings and corresponding names for each person in the dataset (Lines 24 and 25).
27
28
29
30
31
32
33
34
35
36
37
# loop over the image paths
for(i,imagePath)inenumerate(imagePaths):
# extract the person name from the image path
print(„[INFO] processing image {}/{}“.format(i+1,
len(imagePaths)))
name=imagePath.split(os.path.sep)[–2]
# load the input image and convert it from BGR (OpenCV ordering)
# to dlib ordering (RGB)
image=cv2.imread(imagePath)
rgb=cv2.cvtColor(image,cv2.COLOR_BGR2RGB)
This loop will cycle 218 times corresponding to our 218 face images in the dataset. We’re looping over the paths to each of the images on Line 28.
From there, we’ll extract the name of the person from the imagePath (as our subdirectory is named appropriately) on Line 32.
Then let’s load the image while passing the imagePath to cv2.imread (Line 36).
OpenCV orders color channels in BGR, but the dlib actually expects RGB. Theface_recognition module uses dlib , so before we proceed, let’s swap color spaces on Line 37, naming the new image rgb .
Next, let’s localize the face and compute encodings:
39
40
41
42
43
44
45
46
47
48
49
50
51
52
# detect the (x, y)-coordinates of the bounding boxes
# add each encoding + name to our set of known names and
# encodings
knownEncodings.append(encoding)
knownNames.append(name)
For each iteration of the loop, we’re going to detect a face (or possibly multiple faces and assume that it is the same person in multiple locations of the image — this assumption may or may not hold true in your own images so be careful here).
For example, let’s say that rgb contains a picture (or pictures) of Ellie Sattler’s face.
Lines 41 and 42 actually find/localize the faces of her resulting in a list of face boxes . We pass two parameters to the face_recognition.face_locations method:
rgb : Our RGB image.
model : Either cnn or hog (this value is contained within our command line arguments dictionary associated with the „detection_method“ key). The CNN method is more accurate but slower. HOG is faster but less accurate.
Then, we’re going to turn the bounding boxes of Ellie Sattler’s face into a list of 128 numbers on Line 45. This is known as encoding the face into a vector and theface_recognition.face_encodings method handles it for us.
From there we just need to append the Ellie Sattler encoding and name to the appropriate list ( knownEncodings and knownNames ).
We’ll continue to do this for all 218 images in the dataset.
What would be the point of encoding the images unless we could use the encodings in another script which handles the recognition?
As you can see from our output, we now have a file named encodings.pickle — this file contains the 128-d face embeddings for each face in our dataset.
Recognizing faces in video
Figure 7: Facial recognition in video via Python, OpenCV, and deep learning.
Now that we have applied face recognition to images let’s also apply face recognition to videos (in real-time) as well.
Important Performance Note:The CNN face recognizer should only be used in real-time if you are working with a GPU (you can use it with a CPU, but expect less than 0.5 FPS which makes for a choppy video). Alternatively (you are using a CPU), you should use the HoG method (or even OpenCV Haar cascades covered in a future blog post) and expect adequate speeds.
The following script draws many parallels from the previous recognize_faces_image.py script. Therefore I’ll be breezing past what we’ve already covered and just review the video components so that you understand what is going on.
Once you’ve grabbed the “Downloads”, open up recognize_faces_video.py and follow along:
1
2
3
4
5
6
7
8
9
10
11
12
13
14
15
16
17
18
19
20
# import the necessary packages
fromimutils.video importVideoStream
importface_recognition
importargparse
importimutils
importpickle
importtime
importcv2
# construct the argument parser and parse the arguments
help=„face detection model to use: either `hog` or `cnn`“)
args=vars(ap.parse_args())
We import packages on Lines 2-8 and then proceed to parse our command line arguments on Lines 11-20.
We have four command line arguments, two of which you should recognize from above ( —encodings and —detection–method ). The other two arguments are:
—output : The path to the output video.
—display : A flag which instructs the script to display the frame to the screen. A value of 1 displays and a value of 0 will not display the output frames to our screen.
From there we’ll load our encodings and start our VideoStream :
# initialize the video stream and pointer to output video file, then
# allow the camera sensor to warm up
print(„[INFO] starting video stream…“)
vs=VideoStream(src=0).start()
writer=None
time.sleep(2.0)
To access our camera we’re using the VideoStream class from imutils. Line 29 starts the stream. If you have multiple cameras on your system (such as a built-in webcam and an external USB cam), you can change the src=0 to src=1 and so forth.
We’ll be optionally writing processed video frames to disk later, so we initialize writer toNone (Line 30). Sleeping for 2 complete seconds allows our camera to warm up (Line 31).
From there we’ll start a while loop and begin to grab and process frames:
33
34
35
36
37
38
39
40
41
42
43
44
45
46
47
48
49
50
# loop over frames from the video file stream
whileTrue:
# grab the frame from the threaded video stream
frame=vs.read()
# convert the input frame from BGR to RGB then resize it to have
# a width of 750px (to speedup processing)
rgb=cv2.cvtColor(frame,cv2.COLOR_BGR2RGB)
rgb=imutils.resize(frame,width=750)
r=frame.shape[1]/float(rgb.shape[1])
# detect the (x, y)-coordinates of the bounding boxes
# corresponding to each face in the input frame, then compute
Our loop begins on Line 34 and the first step we take is to grab a frame from the video stream (Line 36).
The remaining Lines 40-50 in the above code block are nearly identical to the lines in the previous script with the exception being that this is a video frame and not a static image. Essentially we read the frame , preprocess, and then detect face bounding boxes + calculate encodings for each bounding box.
Next, let’s loop over the facial encodings associated with the faces we have just found:
52
53
54
55
56
57
58
59
60
61
62
63
64
65
66
67
68
69
70
71
72
73
74
75
76
77
78
79
80
# loop over the facial embeddings
forencoding inencodings:
# attempt to match each face in the input image to our known
# find the indexes of all matched faces then initialize a
# dictionary to count the total number of times each face
# was matched
matchedIdxs=[ifor(i,b)inenumerate(matches)ifb]
counts={}
# loop over the matched indexes and maintain a count for
# each recognized face face
foriinmatchedIdxs:
name=data[„names“][i]
counts[name]=counts.get(name,0)+1
# determine the recognized face with the largest number
# of votes (note: in the event of an unlikely tie Python
# will select first entry in the dictionary)
name=max(counts,key=counts.get)
# update the list of names
names.append(name)
In this code block, we loop over each of the encodings and attempt to match the face. If there are matches found, we count the votes for each name in the dataset. We then extract the highest vote count and that is the name associated with the face. These lines are identicalto the previous script we reviewed, so let’s move on.
In this next block, we loop over the recognized faces and proceed to draw a box around the face and the display name of the person above the face:
# if the video writer is None *AND* we are supposed to write
# the output video to disk initialize the writer
ifwriter isNoneandargs[„output“]isnotNone:
fourcc=cv2.VideoWriter_fourcc(*„MJPG“)
writer=cv2.VideoWriter(args[„output“],fourcc,20,
(frame.shape[1],frame.shape[0]),True)
# if the writer is not None, write the frame with recognized
# faces to disk
ifwriter isnotNone:
writer.write(frame)
Assuming we have an output file path provided in the command line arguments and we haven’t already initialized a video writer (Line 99), let’s go ahead and initialize it.
On Line 100, we initialize the VideoWriter_fourcc . FourCC is a 4-character code and in our case we’re going to use the “MJPG” 4-character code.
From there, we’ll pass that object into the VideoWriter along with our output file path, frames per second target, and frame dimensions (Lines 101 and 102).
Finally, if the writer exists, we can go ahead and write a frame to disk (Lines 106-107).
Let’s handle whether or not we should display the face recognition video frames on the screen:
109
110
111
112
113
114
115
116
117
# check to see if we are supposed to display the output frame to
# the screen
ifargs[„display“]>0:
cv2.imshow(„Frame“,frame)
key=cv2.waitKey(1)&0xFF
# if the `q` key was pressed, break from the loop
ifkey==ord(„q“):
break
If our display command line argument is set, we go ahead and display the frame (Line 112) and check if the quit key ( „q“ ) has been pressed (Lines 113-116), at which point we’dbreak out of the loop (Line 117).
Lastly, let’s perform our housekeeping duties:
119
120
121
122
123
124
125
# do a bit of cleanup
cv2.destroyAllWindows()
vs.stop()
# check to see if the video writer point needs to be released
ifwriter isnotNone:
writer.release()
In Lines 120-125, we clean up and release the display, video stream, and video writer.
Are you ready to see the script in action?
To demonstrate real-time face recognition with OpenCV and Python in action, open up a terminal and execute the following command: